Antique Arms & Militaria


An Antique Ethiopian Shotel - Gorode Officer's Sword Of Emperor Menelik IInd's Reign, & Then Into Emperor Halie Selassie's Reign, the Last Ethiopian Emperor
Curved blade fully etched in its tooled red leather scabbard. These very unusual swords with very curved blades come from the "Horn of Africa," which includes Abyssinia, which we now know as Ethiopia. Made famous just before WWII by the Italian Invasion of that Country, and the appeal by it's Emperor Haile Selassie to the League of Nations, which the Western Powers basically ignored. It's Capital is Addis Ababa, a city dating back some 2,000 years and more. A country much in the news but also a land largely still in the middle ages in some respects.
The sword, oft described as a shotel but actually it is a gorade, with its very characteristic curved blade. The swords dates back to the reign of Amda Seyon the 1st, known as "the Pillar of Zion" who was Emperor from 1314 - 1344. Called shotel, while technically the proper term locally for sabre was 'gorade'. Shotel which is not an Amharic word, Amharic for sword is gorade .The blade is etched with the profile of Emperor Menelik II, and also the symbol of the emperor, the Lion of Judah. The rest of the blade is etched with fancy scrolls. Menelik II baptised as Sahle Maryam (17 August 1844 – 12 December 1913) was Emperor of Ethiopia from 1889 to his death in 1913 and King of Shewa from 1866 to 1889. At the height of his internal power and external prestige, the process of territorial expansion and creation of the modern empire-state was completed by 1898. He is widely honoured by many Ethiopians and commemorated during the celebration of the Battle of Adwa, which is celebrated on March 1 or 2 across Ethiopia and in the diaspora. Many Pan-Africans regard him as an advocate for African independence against European powers during the Scramble for Africa. Selassie
Haile Selassie was one of the most famous leaders in Ethiopian history. As the emperor, he was exiled during the Italian occupation of Ethiopia due to the status he held. Selassie would go onto return to Ethiopia and help in taking back control of the country from Italy. On April 2, 1930, Ras Tafari Makonnen became Emperor Haile Selassie. Selassie was the last reigning monarch of Ethiopia’s Solomonic Dynasty. The Solomonic Dynasty traces its ancient ancestry to King Solomon of Israel and the Queen of Sheba, biblical figures who may have lived during the 10th century BCE.
Ethiopia is often acknowledged as the only nation in Africa never to have been colonized, and Selassie emerged as a powerful international figure as other African countries sought independence in the 20th century. His long reign and enduring policies (such as support for African unity and the abolition of slavery in Ethiopia) earned him a privileged position at international summits. For instance, Selassie was one of the highest-ranking diplomats at the funeral of U.S. President John Kennedy.
Selassie’s greatest impact may have been on the island of Jamaica. Jamaican religious leaders adopted a version of his birth name, Tafari (Ras was an official title) and Rastafarians regard Selassie as a god. (Selassie himself remained a Christian throughout his life.). Photo in the gallery of Emperor Hallie Selassie in full dress uniform. 37.5 inches long overall in scabbard, blade 30 inch blade read more
750.00 GBP

A Most Scarce 16th Century Indian 'Firangi' Battle Sword Circa 1500's Basket Hilt Form
From a family armoury collection originally housed in a castle in Scotland, accumulated over 4 centuries.
The name ‘Firangi’ (Foreigner) was apparently given to these swords somewhat later in the 17th Century, as they were mounted with European (Foreign) blades, imported by the Portugese, which were highly valued. Some blades were locally made in the European style. The blades were mounted on the Khanda style hilt and with the long spike extending from the pommel which enabled them to be used as two handed swords. The firangi sword characteristically had a straight blade of backsword form (single edged). The blade often incorporated one, two, or three fullers (grooves) and had a spear-tip shaped point. The sword could be used to both cut and thrust. Examples with narrow rapier blades have survived, though in small numbers. The hilt was of the type sometimes called the "Indian basket-hilt" and was identical to that of another Indian straight-bladed sword the khanda. The hilt afforded a substantial amount of protection for the hand and had a prominent spike projecting from the pommel which could be grasped, resulting in a two-handed capability for the sword. Like other contemporary Indian swords the hilt of the firangi was usually of iron and the tang of the blade was attached to the hilt using a very strong resin, additionally, the hilt to blade connection was reinforced by projections from the hilt onto either face of the forte of the blade which were riveted together though a hole passing through the blade. Because of its length the firangi is usually regarded as primarily a cavalry weapon. Illustrations suggest a 16th-century date for the development of the sword, though early examples appear to have had simpler cross-guard hilts, similar to those of the talwar. The sword has been especially associated with the Marathas, who were famed for their cavalry. However, the firangi was widely used by the Mughals and those peoples who came under their rule, including Sikhs and Rajputs. Images of Mughal potentates holding firangis, or accompanied by retainers carrying their masters' firangis, suggest that the sword became a symbol of martial virtue and power. Photographs of Indian officers of Hodson's Horse (an irregular cavalry unit raised by the British) show that the firangi was still in active use at the time of the Indian Mutiny in 1857-58 The khanda can generally be a double-edge but can be a single edged straight sword. It is often featured in religious iconography, theatre and art depicting the ancient history of India. Some communities venerate the weapon as a symbol of Shiva. It is a common weapon in the martial arts in the Indian subcontinent. Khanda often appears in Hindu, Buddhist and Sikh scriptures and art The word khanda has its origins in the Sanskrit meaning "to break, divide, cut, destroy". Used from the time of Abu'l-Fath Jalal-ud-din Muhammad Akbar (15 October 1542 - 27 October 1605 ), popularly known as Akbar I literally "the great" and later Akbar the Great, he was the third Mughal emperor, who reigned from 1556 to 1605.
29 inch blade to hilt, 35 inches overall read more
795.00 GBP
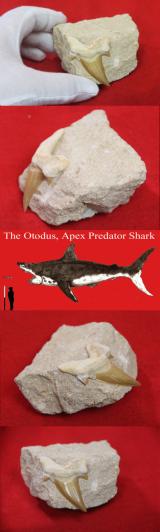
A Superb 60 Million Year Old Otodus Shark's Tooth in Matrix Block Fossil with Large Cusps. The Ancestor of the Megaladon The Giant Great White Type Shark
This would make a fabulous and incredibly unusual and original gift for a loved one. it would make a fabulous desk ornament or cabinet piece
The term matrix refers to the natural rock surrounding a fossil. In the case of fossil bones or teeth encased in rock, the matrix consists of the loose sediments that originally buried the bones, sediments that were later transformed into rock over long stretches of time by the pressure of other sediment layers deposited above them.
The Otodus of 60 million years ago was up to 40 foot long and the Megalodon of 20 million years ago was up to 60 foot long.
A stunning large Otodus shark's tooth fossil in a large matrix block in super condition. One of a small collection we have just been delighted to acquire. It would make a stunning desk ornament, as an impressive collector's item and conversation piece. Otodus is an extinct genus of shark which lived from the Paleocene to the Miocene epoch.
Otodus likely preyed upon large bony fish, other sharks, and from the Eocene until the genus' extinct during the Miocene, marine mammals. It was among the top predators of its time.The fossils of Otodus indicate that it was a very large macro-predatory shark. The vertebral centrum of this shark are over 12.7 cm (5 inch) wide. Scientists suggest that this shark at least reached 9.1 metres (30 ft) in total length, with a maximum length of 12.2 metres (40 ft) The Paleocene Epoch is bracketed by two major events in Earth's history. It started with the mass extinction event at the end of the Cretaceous, known as the Cretaceous–Paleogene (K–Pg) boundary. This was a time marked by the demise of non-avian dinosaurs, giant marine reptiles and much other fauna and flora. The die-off of the dinosaurs left unfilled ecological niches worldwide. The Paleocene ended with the Paleocene–Eocene Thermal Maximum, a geologically brief (0.2 million year) interval characterised by extreme changes in climate and carbon cycling. The otodus was likely the ancestor of the Giant White Megaladon shark of 40 million years later. This tooth was sold on day 1 but we have two others very similar around the same size, the price is the same. As with all our items it comes complete with our certificate of authenticity.
Overall 7 x 8 cm read more
150.00 GBP

A Very Fine 17th Century Spontoon. Central Double Edge Blade With Side Wings. Used For Over 140 Years in Military Service Including From the English Stuart to Early Hanoverian Reigns, The French-Indian War & Revolutionary War In The Americas
With original long, studded full haft, around 8 foot long, with steel foot. Spontoons (also spelled “espontoons”) appeared later than halberds, coming into use in the late 17th century. The word seems to come from the Italian spuntone, meaning “pointed.” A spontoon’s iron point, sometimes decorated with tassels, was fitted to a sturdy hardwood shaft measuring from six to nine feet in length. The weapon’s distinguishing feature were sidewings sometimes plain and sometimes elaborately ornamental, perpendicular to the main blade.
Spontoons may have evolved from earlier spear-like weapons called pertuisanes or partisans. The partisan had a large blade, sharp on both sides. The blade was wider at the bottom, where twin symmetrical blades of various shapes sprouted from the sides. Rather blurry lines separate the spontoon and a number of other spear-like staff weapons. There were hybrids known as “partisan spontoons,” and some 18th-century European accounts refer to officers’ weapons as partisans rather than spontoons. Other sources refer to spontoons as “half-pikes,” and some simply call them spears.
Although the British serving both in America and Europe, used them in the French Indian War {aka the 7 Years War} quite liberally, we put aside a lot of their use as pole weapons during the Revolutionary War, yet spontoons formed a large part of the equipment of the US Continental Army. Captain Daniel Morgan led a portion of the Continental attack on Quebec on December 30, 1775. His men carried spontoons in addition to rifles and scaling ladders. Attacking a two-gun battery, they drove the defenders into a nearby house. Morgan ordered his men to “fire into the house and follow up with their pikes (for in addition to our rifles, we were also armed with long espontoons), which they did, and drove the guard into the street.”
In several surviving written orders, General George Washington insisted that Continental officers carry spontoons. At Valley Forge on December 22, 1777, Washington directed that each officer “provide himself with a half-pike or spear, as soon as possible.” Washington did not want his officers to carry muskets, which he believed had a way of “drawing their attention too much from the men.” He needed the officers focused on commanding their men, not distracted with loading and firing a musket. Additionally, Washington believed that an officer with neither firearm nor spontoon had “a very awkward and unofficerlike appearance.”
In America, spontoons held on into the early Federal period. A North Carolina militia law of 1787 required infantry officers to carry “side arms or a spontoon.” Because militia officers might well wear civilian clothing, a spontoon or sword served as an indication of superior rank.
The U.S. War Department ordered 120 spontoons for its officers in 1800. Captains Meriwether Lewis and William Clark each carried one during their transcontinental expedition of 1804-1806. Both officers would have reason to be glad they were burdened with these heavy staff weapons. In what is now Montana, on the night of May 26, 1805, Lewis nearly stepped on a rattlesnake. Guided by the sound of the rattles, Lewis stabbed about in the dark with his spontoon until he killed the snake. Three days later, Clark killed a wolf with his spontoon. Lewis’s spontoon would twice more save his life, once in driving away a bear and another time when the captain saved himself from falling 90 feet from a precipice by bracing himself with his weapon’s long staff.
Lewis and Clark may have been the last American military officers to get any real use out of the spontoon. Watchmen and policemen in some cities carried smaller versions of spontoons until about 1860, but by the time of the War of 1812, they had essentially disappeared from military life. However, William T. Sherman, in an 1890 article in the North American Review, pointed out that U.S. militia laws still on the books stated that “each commissioned officer shall be armed with a sword or hanger and spontoon.” So, strictly speaking, all militia officers without spontoons were in violation of Federal statutes until the militia laws were revised in 1903.
The British Monarch's Royal Bodyguard, the Yeoman of the Guard, wearing their scarlet and gold full dress Tudor style uniforms, still carry the traditional spontoon polearms {see photo in the gallery at the Tower of London}. In the gallery is a photograph of spontoons in a Swiss castle museum gallery. This one is polearm type number four on the right.
It has its original studded haft but since it has been in armoury display for likely two centuries all its surface velvet is now gone and overall surface worn.
what is incredibly interesting is the iron foot of the spontoon, it is a 17th century Civil War pike head, that has likely lost its point so the haft has been turned around the spontoon head fitted, and the pike head left in place to be used as its foot.
See photo 10 in the gallery to show exactly how the pike {now an iron foot} would have looked with its point intact, the pike is on display in the Metropolitan Museum in the USA.
Delivery completely assembled with its haft is within the UK mainland only due to length.
Two links to a similar spontoon and a pike in the Metropolitan Museum below, for reference
https://www.metmuseum.org/art/collection/search/25095
https://www.metmuseum.org/art/collection/search/25847
Every single item from The Lanes Armoury is accompanied by our unique Certificate of Authenticity. Part of our continued dedication to maintain the standards forged by us over the past 100 years of our family’s trading, as Britain’s oldest established, and favourite, armoury and gallery read more
1745.00 GBP

Original Ancient Roman ‘Cross-bow” Fibula Bronze Toga Pin Military Issue, Fine Piece For Higher Ranking Figures in the Legion, Such As a Centurion or Tribune. Bow Fibula with a Folded Spring Hinge, Early Imperial - Beginning of Anno Domini 2nd Century.
We acquired a very small collection of different Roman toga pins, A super, small collection of original, historical, Imperial Roman, Viking, and Crusader's artefacts has just been acquired by us.
Shaped in the form of a roman military crossbow fibula, in bronze.
It became the most popular form of closure for Roman fibulae, and is characteristic of the bow brooches from the early imperial times to the beginning of the AD 2nd century. Original Ancient Roman ‘Cross-bow” Fibula Bronze Toga Pin Military Issue, Fine Piece For Higher Ranking Figures in the Legion, Such As a Centurion or Tribune, c. Early Imperial - Beginning of AD 2nd Century.Arguments abound over what shoulder was exposed, but it seems fairly clear that the garment was fastened loosely enough to move around, The paludamentum was a cloak that was specifically associated with warfare. A general donned one for the ceremonial procession leading an army out of the sacred precinct of the city of Rome and was required to remove it before returning to the city…a sign that he was no longer a general, but a common citizen. The paludamentum or sagum purpura (purple cloak) was the iconic red cloak worn by a Roman general (Legatus) and his staff officers. Originally, it’s distinctive red/purple color clearly delineated between these officers and the rest of the army, which sported the sagum gregale (cloak of the flock). Although the sagum gregale, worn by the rank and file, started out the color of the flock (i.e. undyed wool), it seems likely to have transitioned to a coarser version of the sagum purpura by the imperial period (27BC – AD 476). Outfitting the entire army in red garments would have been a mark of the great wealth of Rome – well, that and the fact that the Romans controlled the source of purple dye by then.The pin is now frozen through two millennia in a fixed position.
Richard Lassels, an expatriate Roman Catholic priest, first used the phrase “Grand Tour” in his 1670 book Voyage to Italy, published posthumously in Paris in 1670. In its introduction, Lassels listed four areas in which travel furnished "an accomplished, consummate traveler" with opportunities to experience first hand the intellectual, the social, the ethical, and the political life of the Continent.
The English gentry of the 17th century believed that what a person knew came from the physical stimuli to which he or she has been exposed. Thus, being on-site and seeing famous works of art and history was an all important part of the Grand Tour. So most Grand Tourists spent the majority of their time visiting museums and historic sites.
Once young men began embarking on these journeys, additional guidebooks and tour guides began to appear to meet the needs of the 20-something male and female travelers and their tutors traveling a standard European itinerary. They carried letters of reference and introduction with them as they departed from southern England, enabling them to access money and invitations along the way.
With nearly unlimited funds, aristocratic connections and months or years to roam, these wealthy young tourists commissioned paintings, perfected their language skills and mingled with the upper crust of the Continent.
The wealthy believed the primary value of the Grand Tour lay in the exposure both to classical antiquity and the Renaissance, and to the aristocratic and fashionably polite society of the European continent. In addition, it provided the only opportunity to view specific works of art, and possibly the only chance to hear certain music. A Grand Tour could last from several months to several years. The youthful Grand Tourists usually traveled in the company of a Cicerone, a knowledgeable guide or tutor.
The ‘Grand Tour’ era of classical acquisitions from history existed up to around the 1850’s, and extended around the whole of Europe, Egypt, the Ottoman Empire, and the Holy Land.
Fibula 54mm long
Every single item from The Lanes Armoury is accompanied by our unique Certificate of Authenticity. Part of our continued dedication to maintain the standards forged by us over the past 100 years of our family’s trading, as Britain’s oldest established, and favourite, armoury and gallery read more
245.00 GBP
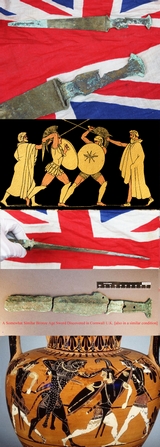
A Superb Excavated & Fragmented Bronze Age Sword 3200+ Years Old. Seige of Troy Period
A very inexpensive pre-history period antiquity of immense beauty and age. A short sword or long dagger traded between the Eastern Mediterranean Scythians, Persians and Greeks during the the Ist millennium B.C. around 2700 to 3200 years ago. Made in bronze in the Western Asiatic region.
Western Asiatic bronzes refer to items dating from roughly 1500-500 BC that have been excavated since the late 1920's in the Harsin, Khorramabad and Alishtar valleys of the Zagros Mountains especially at the site of Tepe Sialk. Scholars believe they were created by either the Cimmerians or by such related Indo-European peoples as the early Medes and Persians.
Weapons from this region were highly sought after by warriors of many cultures because of their quality, balance and durability. Graduating blade with integral hilt, with open panels for organic inserts of wood, bone, or ivory, fabulous areas of crystallized malachite naturally aged blue/green patination.
The acinaces, also spelled akinakes or akinaka is a type of short sword used mainly in the first millennium BC in the eastern Mediterranean region, especially by the Medes, Scythians and Persians, then by the Greeks.
The akinakes was worn at the hip in an elaborate scabbard. The chape, generally a rounded triangle, could be made of bronze, chased gold or carved ivory, and probably lots of other materials. Just above the chape, a cord was tied around the scabbard, passed around the thigh and then through a slipknot next to the chape. The throat had a large tab, which at its own upper corner was tied through a hole in the weapon belt.
We show another most similar Bronze Age short sword or long dagger, in a similar state, excavated near Stonehenge, in the U.K. now in a museum collection. This piece is 17 1/2 inches long overall.
Every single item from The Lanes Armoury is accompanied by our unique Certificate of Authenticity. Part of our continued dedication to maintain the standards forged by us over the past 100 years of our family’s trading, as Britain’s oldest established, and favourite, armoury and gallery read more
845.00 GBP
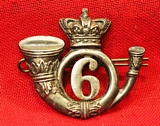
A Rare Victorian Bengal Native Light Infantry Badge in Silver
They were a rifles infantry regiment of the Bengal Army, later of the united British Indian Army. They could trace their origins to 1803, when they were the 1st Battalion, 22nd Bengal Native Infantry. Over the years they were known by a number of different names the 43rd Bengal Native Infantry 1824?1842, the 43rd Bengal Native (Light) Infantry 1842?1861, the 6th Bengal Native (Light) Infantry 1861?1897 and finally after the Kitchener reforms of the Indian Army the 6th Jat Bengal (Light) Infantry. The regiment was involved in the First Anglo-Afghan War, the First Anglo-Sikh War, the Second Anglo-Afghan War, the Boxer Rebellion and World War I. After World War I the Indian Government reformed the army moving from single battalion regiments to multi battalion regiments. The 6th Jat Light Infantry became the new 1st Battalion, 9th Jat Regiment. After India gained independence they were one of the regiments allocated to the Indian Army. read more
245.00 GBP

A Stunning Original 11th,12th Century Crusader’s Battle Axe of War, Used From The Time Kings Henry Ist, King Stephen, Queen Matilda and King Henry IInd, During The Early Crusades to the Holy Land. Regarded as the The Weapon of Choice of Kings, and Knight
In the Norman through to the Plantagenet eras, War Axes were often the weapon of choice of Kings of England in battle. Used from the time of Henry Ist of England, King of England from 1100 to 1135. King Stephen and Queen Matilda, in the age of Anarchy, and through to King Henry IInd 5 March 1133 to 6 July 1189.
Henry 1st was the fourth son of William the Conqueror. Considered by contemporaries to be a harsh but effective ruler, Henry skilfully manipulated the barons in England and Normandy. In England, he drew on the existing Anglo-Saxon system of justice, local government and taxation, but also strengthened it with additional institutions, including the royal exchequer and itinerant justices. Normandy was also governed through a growing system of justices and an exchequer. Many of the officials that ran Henry's system were "new men" of obscure backgrounds rather than from families of high status, who rose through the ranks as administrators. Henry encouraged ecclesiastical reform, but became embroiled in a serious dispute in 1101 with Archbishop Anselm of Canterbury, which was resolved through a compromise solution in 1105. He supported the Cluniac order and played a major role in the selection of the senior clergy in England and Normandy. The early years of Stephen's reign were largely successful, despite a series of attacks on his possessions in England and Normandy by David I of Scotland, Welsh rebels, and the Empress Matilda's husband, Geoffrey of Anjou.
In 1138 the Empress's half-brother Robert of Gloucester rebelled against Stephen, threatening civil war. Together with his close advisor, Waleran de Beaumont, Stephen took firm steps to defend his rule, including arresting a powerful family of bishops. When the Empress and Robert invaded in 1139, however, Stephen was unable to crush the revolt rapidly, and it took hold in the south-west of England. Captured at the battle of Lincoln in 1141, Stephen was abandoned by many of his followers and lost control of Normandy. Stephen was freed only after his wife and William of Ypres, one of his military commanders, captured Robert at the Rout of Winchester, but the war dragged on for many years with neither side able to win an advantage. Henry Iind was an energetic and sometimes ruthless ruler, driven by a desire to restore the lands and privileges of his royal grandfather, Henry I. During the early years of the younger Henry's reign he restored the royal administration in England, re-established hegemony over Wales and gained full control over his lands in Anjou, Maine and Touraine. Henry's desire to reform the relationship with the Church led to conflict with his former friend Thomas Becket, the Archbishop of Canterbury. This controversy lasted for much of the 1160s and resulted in Becket's murder in 1170. Henry soon came into conflict with Louis VII and the two rulers fought what has been termed a "cold war" over several decades. Henry expanded his empire, often at Louis' expense, taking Brittany and pushing east into central France and south into Toulouse; despite numerous peace conferences and treaties no lasting agreement was reached. By 1172, he controlled England, large parts of Wales, the eastern half of Ireland and the western half of France, an area that would later come to be called the Angevin Empire.
Normans were very strongly represented in the First Crusade, in 1096–1099. At that time, the Normans were the best fighters, the shock troops, of Western Christendom, and looking for places to fight and rule. Different groups of Normans had recently taken over England, and were in the process of taking over Sicily (plus the southern half of Italy), defeating the last Muslim Emir of Sicily in 1091. Moreover, they were the newly reformed Papacy’s greatest allies and supporters, as ferocious in piety as in war.
Among the Norman leaders of the 1st Crusade were Robert Curthose (first son of William the Conqueror and later Duke of Normandy himself), Bohemond of Taranto, who masterminded the capture of Antioch and became its first crusader Prince, Tancred of Hauteville, who became Prince of Galilee in the new Kingdom of Jerusalem, and Richard of Salerno, who later acted as regent in the crusader County of Edessa.
By the time the Second Crusade took place, in 1147–1150, Norman greatness was already starting to wane. When the last Norman King of England died at that point the Duchy of Normandy lost its independence and ceased to be a major force in French affairs. The most famous of all English crusaders was, of course, Richard I, the “Lionheart,” but we should not forget that his father too had taken a strong interest in the fate of the crusader kingdoms. Two years before the fateful Battle of Hattin in 1187, Henry promised to support 200 knights annually in the Holy Land as part of his penance for the murder of Thomas of Becket. In consequence, 200 “English” knights fought at Hattin, although sources are unclear as to whether these knights were Englishmen, subjects of Henry Plantaget, or simply knights financed by Henry II.
Regardless of their exact nationality, two hundred knights out of a total of 1200 to 1500 is significant. Furthermore, Henry II personally took crusading vows after the fall of Jerusalem to Saladin. Although many question Henry II’s sincerity – and he certainly had good reasons for thinking he should not leave his vast domains unprotected or his unruly vassals without royal oversight for too long – there can be no doubt that he did introduce a “Saladin Tithe.”These revenues were collected directly by the Knights Templar and were certainly employed to help finance the Third Crusade. Thus, while Henry II did not personally take part in a crusade, he provided something arguably more important at this juncture in time – the means to outfit, transport and sustain many other fighting men.
Almost every iron weapon that has survived today from this ancient era is now in a fully russetted condition, as is this one, because only the weapons of kings, that have been preserved in national or royal collections, are today, still in a relatively fair state and condition. Surviving ancient medieval axes, such as we offer here, can be incredibly inexpensive and great value, compared to their combat cousins, the knightly sword. Firstly, because knightly swords cost far more in their day, and were thus rarer, and secondly, when a knightly sword is lost in combat and buried in the ground very few survive, due to the thin iron blade structure, whereas the axe has far more 'meat on the bone' so to speak, and will fare much better from the vagaries and corruption of time. Wooden hafts and sword handles on the other hand never survive
5.5 inch blade's edge read more
1195.00 GBP

A Beautiful, Victorian, Scottish Artillery Service Helmet of the First Renfrew and Dumbarton Artillery. Blue Cloth with Silver Badge, Fittings, Ball Top, & Rose Head Curb Chain Mounts and Chin Chain
Overall in superb condition, just the usual wear to the blue cloth surface The 1st Renfrew and Dumbarton Artillery Volunteers was a part-time unit of the British Army's Royal Artillery founded in Scotland in 1860.
The Artillery Volunteers were formed in response to perceived threats of invasion, particularly from France during the mid-19th century. By 1881, these units were well established as part of Britain’s auxiliary forces, providing coastal and homeland defense. The First Renfrew and Dumbarton unit operated in Scotland, drawing recruits from these regions, and contributed to local and national defense efforts.
Officers' helmets like this are prized by collectors for their craftsmanship and historical significance, offering a glimpse into the organization, pride, and traditions of Scottish Victorian-era volunteer forces.
The helmet plate is crafted with intricate detailing. Such plates were worn on the helmets of officers as a part of their formal uniform.
Central Emblem: The plate features a central badge, often incorporating a cannon or artillery piece, symbolizing the artillery unit, surrounded by wreaths of laurel and oak to represent victory and strength.
Crown: It is topped by a Victorian Crown (Queen Victoria's reign), indicating the era of service.
Unit Designation: The name "First Renfrew and Dumbarton Artillery Volunteers" is prominently displayed.
The enthusiasm for the Volunteer movement following an invasion scare in 1859 saw the creation of many Rifle and Artillery Volunteer Corps composed of part-time soldiers eager to supplement the Regular British Army in time of need.Three Artillery Volunteer Corps (AVCs) were formed in Renfrewshire and three more in neighbouring Dumbartonshire in 1860, and on 22 August 1863 all six were included in the 1st Administrative Brigade, Renfrewshire Artillery Volunteers, under the command of Lieutenant-Colonel John Scott, with its headquarters (HQ) at Greenock:
1st (Greenock) Renfrewshire AVC formed 20 January 1860, four batteries by 1867
2nd (Greenock) Renfrewshire AVC formed 20 January 1860, absorbed into 1st in 1864
3rd (Greenock) Renfrewshire AVC formed 20 January 1860, absorbed into 1st in 1864
1st (Helensburgh) Dumbartonshire AVC formed 9 February 1860
2nd (Rosneath) Dumbartonshire AVC formed March 1860, moved to Kilcreggan 1866, disbanded in 1872
3rd (Dumbarton) Dumbartonshire AVC formed 24 December 1860, increased to two batteries 22 March 1869
When the AVCs were consolidated in May 1880, the administrative brigade became the 1st Renfrewshire (Renfrew and Dumbarton) Artillery Volunteers, shortly afterwards adopting the title of 1st Renfrew and Dumbarton Artillery Volunteers with the following organisation
HQ, Greenock
Nos 1–4 Batteries, Greenock
No 5 Battery, Helensburgh
No 6–7 Batteries, Dumbarton
In 1882 all the AVCs were affiliated to one of the territorial garrison divisions of the Royal Artillery (RA) and the 1st Renfrew & Dumbarton AV became part of the Scottish Division. In 1889 the structure was altered, and the corps joined the Southern Division. In 1899 the RA was divided into separate field and garrison branches, and the artillery volunteers were all assigned to the Royal Garrison Artillery (RGA). When the divisional structure was abolished their titles were changed, the unit becoming the 1st Renfrew and Dumbarton Royal Garrison Artillery (Volunteers) on 1 January 1902
During the First World War, it served with 51st (Highland) Division at the Battle of the Somme before being broken up. In the Second World War, the regiment saw action in the Battle of France, in the campaigns in North Africa, Sicily, Italy, the Greek Civil War and in North West Europe. read more
895.00 GBP
To Find Antique Arms, Armour & Specialist Books in the UK There is Only one place you need to visit. We Trust You Will All Enjoy Your Visit & Viewing Experience of Our Online Site, Frequently Described As The Best Militaria Collectables Site in the World
This week we be showing our usual intriguing and amazing selection of our latest rare and fascinating pieces, including some fabulous and most beautiful and historical collectables offered on our site over the past few days, including a stunning, ancient and exceptional 1700 to 1600 Year Old Spartha Sword of A Warrior of the Roman Empire's Invasions by the Huns and Visigoths. A 10th century ceramic 'Greek Fire' grenade, very rare example incised with overal flame decor and a flaming ball spout.
A Hun or Visigoth Horseman's Sword Spartha With Its Lifstein, the Magical Life-Stone, and Original Crossguard Plus stunning ancient Roman rings, one a Gladiator’s ring, also, Greek arrow heads, spears, lead sling bullets, antiquities and rings from an 1820 Grand Tour Collection. A Stunning Pair of Antique, Signed, French Rococo Patinated Bronze and Gilt Bronze Satyr & Bacchus Candelabra, Louis XVI, Signed Clodion. On Griotte Rouge Marble, Fluted & Truncated Columns, A Fabulous Museum Grade Samurai Daimyo's Art-Sword. From The Koto Era. A Samurai Wakizashi Sword By Master Tadamitsu With Rare Gaku-mei Nakago. Blade, Circa 1440-1460. Mino Goto Koshirae, With Deep Red Ishime Lacquer Saya & Black Silk Binding, plus we have added another rare, original Archaic Chinese Warrior's 'Bronze & Tinned' Jian Sword, 2300+ years old, from a collection we acquired, from one of the most respected and academically admired experts in ancient Chinese swords the UK,.... and so, so much more.
We Are Also Europe's Leading Original Samurai Sword Specialists.
We were listed by the world famous New York Times as one of the ‘must see’ places for Americans to visit when in Europe!! and regularly, as one of the very best shops in the whole of Great Britain. And bearing in mind, in the UK, recorded in 2019, there were 306,655 retail outlets,..apparently, so as you can imagine, the competition was pretty stiff.
Last year we were consultants on three seperate docu/dramas based around original historical warfare
For us it is vitally important that every customer, old and new, has confidence to deal with a well established, generations old company that believes every customer must have an enjoyable, successful and satisfactory experience, and you can know that you can also enjoy a personal one to one contact with our partners during any visit to our permanent gallery in Brighton, which for us is a priority.
Here are just two of our clients comments we received in the past few days.
‘Today the armour arrived. It was of the highest quality as always and I am more than satisfied. Kindest regards C.C.’ From New York
‘The swords arrived and are simply lovely. In fact, the Light Company sabre is especially striking, and it's out of this world. You take very fine photos but they simply didn't do this piece justice. The French sword has tremendous presence. It's hard to find French Napoleonic pieces over here, especially ones with little or no wear. Many thanks again”
A.G. From Australia
Enjoy our site, it has been over 100 years in the making!.
The history of the ‘Grand Tour’
Richard Lassels, an expatriate Roman Catholic priest, first used the phrase “Grand Tour” in his 1670 book Voyage to Italy, published posthumously in Paris in 1670. In its introduction, Lassels listed four areas in which travel furnished "an accomplished, consummate traveler" with opportunities to experience first hand the intellectual, the social, the ethical, and the political life of the Continent.
The English gentry of the 17th century believed that what a person knew came from the physical stimuli to which he or she has been exposed. Thus, being on-site and seeing famous works of art and history was an all important part of the Grand Tour. So most Grand Tourists spent the majority of their time visiting museums and historic sites.
Once young men and women began embarking on these journeys, additional guidebooks and tour guides began to appear to meet the needs of the 20-something male and female travelers and their tutors traveling a standard European itinerary. They carried letters of reference and introduction with them as they departed from southern England, enabling them to access money and invitations along the way.
With nearly unlimited funds, aristocratic connections and months or years to roam, these wealthy young tourists commissioned paintings, perfected their language skills and mingled with the upper crust of the Continent.
The wealthy believed the primary value of the Grand Tour lay in the exposure both to classical antiquity and the Renaissance, and to the aristocratic and fashionably polite society of the European continent. In addition, it provided the only opportunity to view specific works of art, and possibly the only chance to hear certain music. A Grand Tour could last from several months to several years. The youthful Grand Tourists usually traveled in the company of a Cicerone, a knowledgeable guide or tutor.
The ‘Grand Tour’ era of classical acquisitions from history existed up to around the 1850’s, and extended around the whole of Europe, Egypt, the Ottoman Empire, and the Holy Land.
As with all our items, they come complete with our certificate of authenticity read more
Price
on
Request