

Wonderful Napoleonic Wars 'Brown Bess' Officer's Musket, Made by One Of The Most Famous & Greatest English Gunsmiths, Harvey Walklate Mortimer. A Fabulous Example, In Superb Condition. A Far Better Example Than The Mortimer Bess in The Royal Collection
Excellent steel on all parts, barrel and lock, finest walnut stock with stunning natural patina, very fine regulation pattern brass mounts, including side plate ramrod pipes and butt plate {regimentally numbered 10} both original sling swivels present. As this is the officers issue Brown Bess, this would be very unlikely to be a rack number, as the officers did not keep their muskets on racks with the other ranks guns, but in their quarters on campaign, thus it may represent the 10th (North Lincolnshire) Regiment of Foot.
The regiment served with particular distinction in the Napoleonic Peninsular War (1808-14) from 1812 to 1814. Their key campaigns were the Siege of Tarragona: The battalion formed part of General John Mackenzie’s 2nd Division in 1813.
The Battle of Castalla: Fought in April 1813, this was one of their major engagements, resulting in a successful allied victory against French forces. The Blockade of Barcelona: The regiment saw out the final stages of the Peninsular War in Spain through 1814 as operations shifted to Catalonia. The battalion also saw service in Malta, Sicily, and northern Italy
It would be very hard indeed to see a better example, of an officer's issue 'Brown Bess' {Third Pattern} anywhere. Another one of these India Pattern, 1st model ‘Brown Bess’, also by H W Mortimer, likely from the very same contract order, is now in the British Royal Collection, and it is not in anywhere in as good condition as this absolute beauty.
Harvey Walklate Mortimer (1753-1819) gun maker for His Majesty the King, was a British gunsmith known for his exquisite craftsmanship and innovative designs. His pistols, and muskets, often adorned with intricate engravings, were highly sought after by both military officers and civilians. Mortimer's work is characterized by its precision, balance, and meticulous attention to detail, showcasing a mastery of both form and function. His legacy continues to inspire gunsmiths and collectors today, cementing his place as a significant figure in the history of firearms.
The Royal Collection has an identical British infantry officer's example, made for the Napoleonic Wars, Object number:
XII.103, but their Brown Bess by Mortimer has been converted to a percussion action.
The 'Brown Bess' infantry musket was the standard weapon of the British infantry for more than a century.
From the Seven Years war, the American revolution, The Anglo French Wars and The Napoleonic Wars. Also soldiers on both sides of the Anglo American War of 1812 employed it in battle, staring down its barrel at opponents across distances of less than a hundred yards.
British foot soldiers marched into battle with this musket—nicknamed “Brown Bess”—for more than 100 years. British redcoats used the 'Brown Bess' to fight the War of Independence in the colonies, and many of their opponents in the Americans’ Continental army used it as well. British soldiers fighting in the Napoleonic wars carried it into battle, and it was the principal firearm used by the infantrymen who fought the War of 1812.
The Brown Bess had several distinctive features. It was a large-calibre weapon: the bullet it fired was a lead ball up to three-quarters of an inch in diameter, three times the diameter of a modern .22-caliber rifle round. The inside of its barrel was smooth: unlike more accurate “rifled” muskets used by the famous rifle regiments, the Brown Bess had a smooth bore with no grooves to make its fire more accurate. Soldiers loaded the musket through the muzzle, which meant that each bullet had to be forced down a longer than three foot barrel before firing. Even trained soldiers could only launch two or three shots per minute.
Because the weapon was slow to load and relatively inaccurate (experienced soldiers generally estimated its range between 50 and 100 yards), armies developed tactics that helped compensate for its shortcomings. The limitations of smoothbore muskets like the Brown Bess forced units employ “linear tactics,” in which a hundreds of soldiers stood in neat lines, shoulder-to-shoulder and out in the open. While such tactics appear decidedly unstealthy to twenty-first century eyes, they proved essential on the battlefields of all the conflicts which Britain was involved.
There, stealth was a low priority. Packing the men into blocks allowed officers to coordinate their troops’ fire into synchronized volleys. Firing a hundred guns in the same direction at once helped ensure that at least some, often most of the inaccurate musket balls found their targets. And grouping the men into neat lines out in the open helped commanders ensure that few of their troops gave in to the natural instinct to flee.
Of course, packing troops into blocks and fighting in the open required tremendous discipline from the individual soldiers. Infantrymen had to stand exposed to enemy fire as they loaded and fired their own muskets. And in some situations, soldiers learned the grisly dangers of fighting in lines—as at the Battle of New Orleans in the 1812 war, where American artillery attacked the exposed British formations with devastating effect.
The world changed in 1793, a mere 10 years after the loss of the American colonies. Britain found itself once again at war, this time with Revolutionary France. An army now reduced in size to an authorized strength of only 44,432 men had to be expanded rapidly, along with the local militia and volunteer forces. The call for muskets was huge. Indeed, in 1793 the total stock of muskets in all the armouries around Britain, including the central arsenal at the Tower of London, was around a mere 60,000. The stocks held in French arsenals amounted to over a very sensible 700,000. Although it is clear that we are currently abysmally unprepared for the defence of these islands today, 250 years ago, it was exactly the same, as it was in 1939 before WW2. Around 110 years ago former army general Baden Powell created the Boy Scouts with the motto 'Be Prepared', hopefully, to instill in those young minds, a sound and sensible life principle to counter the constant unpreparedness, for all manner of emergencies, of the British Government. A situation that the General Staff consistently find so tragic, yet it is never able to change the policy of the politicians, and this appalling deadly situation, continues, even unto today.
The Board of Ordnance had to fill the gap. They did this by ordering 10,000 muskets from the Birmingham and London gun trade
The lock is stamped by the primary, senior ordnance inspector, for arms provided by ordnance contractors for the armaments required for the Napoleonic Wars
Richard Duce {his mark of Crown 2}. He was also the controller of tempering & hardening of locks, after their arrival from the stores for fitting to the musket.
Stamped with London Gunmaker's Company proof marks. It has a hook breech and is secured by three slides. Lock engraved with the name of the maker Mortimer.
He also inspected all the EIC Brown Bess that were handed over to the British Ordnance for the Napoleonic Wars. An account that was confirmed to us by our friend and historic colleague, Howard Blackmore of the Tower of London armoury. read more
3950.00 GBP

A, Original Napoleonic Wars ‘Tower of London’ Brown Bess Musket. Third Pattern, Napoleonic Wars Issue. 39 inch Barrel Regulation Lock, Stock, Mounts and Fittings. Circa 1808 With Ring Necked Cock
A very good regulation Brown Bess ‘Tower of London’ India Pattern Musket of The Napoleonic Wars, Waterloo etc. The standard musket issued to the British soldier throughout the late 18th and early 19th centuries was the India Pattern model, made in two variants and used against both Revolutionary and Napoleonic France. The first model was introduced in 1793 and the updated version in 1810
Probably the most famous military flintlock musket in the world today, and certainly one of the most historically important and desirable long guns of its type from the Napoleonic wars.
In one day alone, June 1815, at the Battle of Waterloo, it is estimated four million rounds were fired by the 50,000 infantry {estimated at 80 cartridges per man} with their India Pattern Brown Bess muskets, at Napoleon’s army.
A typical regulation example exceptional and excellent condition, with a stunning colour and patina.
A British Napoleonic Wars regulation, regiment of the line issue musket, Crown GR and Tower, ring neck cock lock with government GR Crown stamp, regulation brass mounts, iron ramrod replaced. Walnut stock with signs of combat use but still exceptionally fine. A musket that it would be difficult to improve upon to find a better example.
The Brown Bess musket began its life almost 300 years ago, and it helped in creating one of the greatest trading empires the world has ever seen and, among other achievements, made the 'British Square' the almost undefeated form of infantry defence throughout the world. Made in four distinct patterns it originally started life as a 46 inch barrel musket called the Long Land or Ist pattern Brown Bess. Then in around 1768 the gun evolved and the barrel was shortened to 42 inches as 46 was deemed unwieldy and renamed the Short Land or 2nd pattern. Although the Long Land was made continually for another 20 years. With the onset of the Napoleonic Wars in the 1790s, the British Board of Ordnance found itself woefully short of the 250,000 muskets it would need to equip its forces. It managed to produce around 20,000 short land pattern muskets but this was simply not sufficient. At that time the British East India Company maintained it own troops and had contracted with makers to produce a simplified version of the Brown Bess musket with a 39-inch barrel and less ornate furniture and stock work. It was generally felt that the standard of these "India pattern" muskets was not up to the standard of the earlier Besses, but necessity required action so the authorities convinced Company officials to turn over their stores to the Crown. By 1797 the urgencies of war ultimately created the demise of the Short Pattern, and all manufacture was turned to building the more simple 'India' pattern. For the most part, the gun underwent few changes from its introduction until Waterloo, with the exception of the cock, which was altered from the traditional swan-neck style to a sturdier, reinforced ringed version in around 1808.
The Brown Bess musket was the standard weapon of the British for more than a century. soldiers marched into battle with this musket—nicknamed “Brown Bess”—for more than 100 years. British redcoats used the Brown Bess to fight the War of Independence in the colonies, and many of their opponents in the Americans’ Continental army used it as well.
British soldiers fighting in the Napoleonic wars carried it into battle, and it was the principal firearm used by the infantrymen who fought the War of 1812.
Because the weapon was slow to load and relatively inaccurate (experienced soldiers generally estimated its range between 50 and 100 yards), armies developed tactics that helped compensate for its shortcomings. The limitations of smoothbore muskets like the Brown Bess forced units employ “linear tactics,” in which a hundreds of soldiers stood in neat lines, shoulder-to-shoulder and out in the open. While such tactics appear decidedly unstealthy to twenty-first century eyes, they proved essential on the battlefields of all the conflicts which Britain was involved.
There, stealth was a low priority. Packing the men into blocks allowed officers to coordinate their troops’ fire into synchronized volleys. Firing a hundred guns in the same direction at once helped ensure that at least some, often most of the inaccurate musket balls found their targets. And grouping the men into neat lines out in the open helped commanders ensure that few of their troops gave in to the natural instinct to flee.
Of course, packing troops into blocks and fighting in the open required tremendous discipline from the individual soldiers. Infantrymen had to stand exposed to enemy fire as they loaded and fired their own muskets. And in some situations, soldiers learned the grisly dangers of fighting in lines—as at the Battle of New Orleans in the 1812 war, where American artillery attacked the exposed British formations with devastating effect.
Engagements for the infantry were traditionally at relatively close distances, often the result of closely controlled battlefield management. In 1811 a soldier of the 71st Regiment of Foot, writing of fighting the French at Fuentes de Onõro, recorded: “… during our first advance a bayonet went through between my side and clothes, to my knapsack, which stopped its progress. The Frenchman to whom the bayonet belonged fell, pierced by a musket ball from my rear-rank man. Whilst freeing myself from the bayonet, a ball took off part of my right shoulder wing and killed the rear-rank man, who fell upon me. We kept up our fire until long after dark. My shoulder was black as coal from the recoil of my musket; for this day I had fired 107 round of ball cartridge.”
This was not an uncommon account and it would have been just as true of Waterloo. If we were to take an average of 80 cartridges fired by about 50,000 allied infantry at Waterloo the expenditure of ammunition would have amounted to more than four million cartridges. Although not scientific, it does give a flavour of the ferocity of battle that Sunday in June 1815.
Barrel 39inch overall 54.75 inches long.
Action has a very good and strong mainspring. As with all our antique guns no license is required as they are all unrestricted antique collectables read more
3450.00 GBP

An Original, Incredibly Rare 'Damascus' Presentation Sword, An Imperial German, Damascus Steel and Gold, Sword Presented by One of Germany’s Most Powerful and Influential Families in 1887
This is a magnificent example of one of the rarest most desirable and valuable German swords made in 200 years. Made by Numan of Berlin, personally, for Baron Von Hammerstein. One of two similar museum grade Imperial German swords we were delighted and privileged to acquire, and certainly one of the very best examples, with the highest of provenanced pedigrees ever to come onto the open market.
The highest grade possible of German military sword to be commissioned during the 19th and 20th centuries, encompassing the Imperial, Weimar and Third Reich eras of Germany.
This fabulous sword was presented by Baron von Hammerstein, one of the great military commanders, from one of the greatest of families of the Imperial German empire, whose influence and power continued through the demise of the empire in 1918, right through the post WW1 Weimar period and into the notorious Third Reich. This sword would have been used by the recipients family’s officers, right through all of those eras, and continually into the end of the WW2, despite the Von Hammerstein family being fervent anti-nazi. Which in of itself shows just how powerful the family once was, to survive, indeed thrive, being such vocal opponents of Hitler, at least, in private.
A 'Grosse Degan', translates to the ‘great size sword’ is around 50% heavier, wider and substantial, and a far superior quality than the regular officer’s sword of the day. Presented in the late 19th century, these significant and important Damascus swords were effectively, the swords of Kings, worn by the highest ranking officers Generals, Field Marshals, Dukes and Kings right through WW1 and also WW2. For example we show in the gallery Field Marshal von Kleist with his identical family sword, that was also an antique Imperial sabre, but worn by him in WW2.
Also, a photograph of His Majesty King George Vth the Queen's grandfather and Kaiser Wilhelm of Prussia King George's cousin in their ceremonial Colonel-in-Chief uniforms. King George Vth is in his full dress ‘honorary’ Imperial German uniform with pickelhaub helmet and also wearing his identical grade of sword to ours. Before WW2 it was common for foreign kings to be made honorary colonels to other countries regiments. For example until WW1 Kaiser Willhelm was an honorary colonel of a British regiment, the Kaiser’s Own.
Superb condition for age, with its original steel scabbard. German Damascus swords, made with the traditional ‘Damascus steel’ method are incredibly scarce and valuable, and from Imperial Germany are the most desirable of all German swords. This superb example was presented by one of the members of the great German noble families, in Cassel, in 1887. It bears a presentation inscription, given by Ernst Baron von Hammerstein to his friend Rudolf Frank. On the obverse, For Service, Cassel 1887. Ernst von Hammerstein attended high school in Hildesheim, Hanover, the Royal Corps of Cadets, the University of Gottingen and the Forest Academy Mariabrunn in Austria. In 1857 he was a lieutenant in the 3rd Hanoverian Infanterie-Regiment Infantry Regiment and in 1858 First Lieutenant. In 1866 he took part in the Battle of Langensalza. He was, until 1871, in the personal service of King George V of Hanover. The Von Hammersteins had a most influencial part in German history from the 1600's. Ernst's later relative was Commander of the German Army until Hitler took power, and was also a fervent anti Nazi, taking part in several conspiricies, but never caught or imprisoned, until his natural death in 1943Born to a noble family in Hinrichshagen, Mecklenburg-Strelitz, Germany in 1878, Baron von Hammerstein-Equord joined the German Army on 15 March 1898. In 1907 Hammerstein married Maria von Luttwitz, the daughter of Walther von Luttwitz. He was attached to the General Staff during World War I and participated in the Battle of Turtucaia. Hammerstein-Equord was loyal to the Weimar Republic, opposing the Kapp-Luttwitz putsch in 1920. He served as Chief of Staff of the 3rd Division from 1924, as Chief of Staff of the I Group Command in 1929, and as Head of Troops in the Office Ministry of War from 1929. A close friend of Kurt von Schleicher, he was appointed Commander-in-Chief of the Reichswehr in 1930, replacing General Wilhelm Heye. Another was a U Boat Commander in WWII Adolf-Wilhelm von Hammerstein-Equord joined the Kriegsmmachinearine in 1937. He went through U-boat training from Oct 1940 to April 1941. He went through U-boat familiarization (Baubelehrung from April to May 1941 and then became First Watch officer (1WO) on the new U-402 (Kptlt. Siegfried von Forstner) from May to Oct 1941. He left the boat just prior to its first patrol at the end of Oct 1941 (Busch & R?ll, 1999).
He then became the First Watch officer (1WO) on the U-71 (Kptlt. Walter Flachsenberg) in Oct 1941 and served on the boat until April 1942 (Busch & R?ll, 1999). During this time he went out on 2 war patrols, 92 days at sea, and took part in sinking 5 ships for almost 39,000 tons.
Von Hammerstein-Equord then went through U-boat Commander training with the 24th Flotilla and U-boat Commander sea training on the "duck" U-149 from April to July 1942
Adolf-Wilhelm Baron von Hammerstein-Equord took command of his old boat U-149 on 1 Aug 1942, commanding the boat until 14 May 1944 (Busch & R ll, 1999). The boat was a school boat and von Hammerstein-Equord never went out on patrol with it.
Leaving his boat he joined the Staff of the U-boat Command in Norway and stayed in staff positions there until the end of the war in May 1945 read more
9995.00 GBP

1st Century Roman Bronze Ring, Engraved Intaglio of Goddess Minerva With Her Spear & Shield, Inlaid With Red Enamel. For Such As A Roman Centurion or An Equites
Henig type Xb. Although the surface is age worn one can see her helmeted head, spear and shield, and her shield and robe are decorated with inlaid red enamel.
This is a wonderful, high middle status ancient Roman ring, of centurion or equestrian quality, from the time of the Emperors Augustus, Tiberius, Caligula, Claudius & Nero.
Classified by the seminal classification of ancient ring forms, by Dr. Martin Henig, as Ancient Roman, Henig type Xb. Roman ring around 1900 years old. In copper bronze with great, natural age patination. Beautifully carved intaglio seal detail of wide oval bezel affixed to flattened shoulders engraved copper alloy, with a fair amount of aged surface russetting. Almost identical to one found in the UK, near Hadrian's Wall (but that example had no rare enamel work}. The ring was important for displaying the Roman's status. For example Tiberius, who was after all left-handed according to Suetonius, thus displays a ring in his bronze portrait as the Pontifex Maximus:
From a small collection of British recovered original Roman rings, all in excavated condition, found in the 19th century from the same location. Examples of this type can be found in Henig, M. (1974) A corpus of engraved gemstones from British Sites, British Archaeological Reports 8 (II): 90.
By the time of Claudius, equestrians {or equites} could reasonably expect an important and good career. After serving in the army as an officer, a potential equestrian might become a procurator – an agent of the emperor. He could then become a prefect, or government administrator, at home or abroad.
From the earliest times and throughout the Republican period and beyond, Roman equites subscribed, in their role as Roman cavalrymen, to an ethos of personal heroism and glory. This was motivated by the desire to justify their privileged status to the lower classes that provided the infantry ranks, to enhance the renown of their family name, and to augment their chances of subsequent political advancement in a martial society. For equites, a focus of the heroic ethos was the quest for spolia opima, the stripped armour and weapons of a foe whom they had killed in single combat. There are many recorded instances. For example, Servilius Geminus Pulex, who went on to become Consul in 202 BC, was reputed to have gained spolia 23 times
The bronze copper alloy is naturally aged over 2000 years to now present a natural green patination with surface encrustations. Originally it would have shone like gold. The carvings on rings and seals are known as Intaglio, and a seal ring was part of Roman society for nobles, military officers and citizens. They were personal signets, and the more valuable were made from a small gemstone, with a design cut into the surface by skilled craftsmen, and usually set within a ring. They were used to seal important documents, and objects by making an impression on soft clay or wax. Wearing a carved carnelian or jasper signet ring immediately showed that you were of rank, and thus had status, wealth and influence. Some surviving rings have been found across Roman Britain, in towns and military sites alike, including two at the Waddon Hill former Roman military fort site..
Athena, often given the epithet Pallas, is an ancient Greek goddess associated with wisdom, warfare, and handicraft who was later syncretized with the Roman goddess Minerva. Athena was regarded as the patron and protectress of various cities across Greece, particularly the city of Athens, from which she most likely received her name. The Parthenon on the Acropolis of Athens is dedicated to her. Her major symbols include owls, olive trees, snakes, and the Gorgoneion. In art, she is generally depicted wearing a helmet and holding a spear. The myth of Minerva's birth follows that of Athena. In it, Minerva was borne of Metis, who had been swallowed by Jupiter, and burst from her father's head, fully grown and clad in armour.
Jupiter had sex with the titaness Metis, which resulted in her attempting to change shape (or shapeshift) to escape him. Jupiter then recalled the prophecy that his own child would overthrow him, as he had Saturn, and in turn, Saturn had Caelus. Fearing that their child would be male, and would grow stronger than he was and rule the Heavens in his place, Jupiter swallowed Metis whole after tricking her into turning herself into a fly. The Titaness gave birth to Minerva and forged weapons and armour for her child while within Jupiter's body. In some versions of the story, Metis continued to live inside of Jupiter's mind as the source of his wisdom. Others say she was simply a vessel for the birth of Minerva. The constant pounding and ringing left Jupiter with agonizing pain. To relieve the pain, Vulcan used a hammer to split Jupiter's head and, from the cleft, Minerva emerged, whole, adult, and in full battle armour.
Augustus, Gaius Julius Caesar Augustus (born Gaius Octavius; 23 September 63 BC – 19 August AD 14), was also known as Octavian, and was the founder of the Roman Empire. He reigned as the first Roman emperor from 27 BC until his death in AD 14. The reign of Augustus initiated an imperial cult, as well as an era of imperial peace (the Pax Romana or Pax Augusta) in which the Roman world was largely free of armed conflict. The Principate system of government was established during his reign and lasted until the Crisis of the Third Century.
Tiberius Julius Caesar Augustus 16 November 42 BC – 16 March AD 37, was Roman emperor from AD 14 until 37. He succeeded his stepfather Augustus, the first Roman emperor. Tiberius was born in Rome in 42 BC to Roman politician Tiberius Claudius Nero and his wife, Livia Drusilla. In 38 BC, Tiberius's mother divorced his father and married Augustus. Following the untimely deaths of Augustus's two grandsons and adopted heirs, Gaius and Lucius Caesar, Tiberius was designated Augustus's successor. Prior to this, Tiberius had proved himself an able diplomat, and one of the most successful Roman generals: his conquests of Pannonia, Dalmatia, Raetia, and (temporarily) parts of Germania laid the foundations for the empire's northern frontier.
Caligula, Gaius Caesar Augustus Germanicus was Roman emperor from AD 37 until his assassination in AD 41. He was the son of the Roman general Germanicus and Augustus' granddaughter Agrippina the Elder, members of the first ruling family of the Roman Empire. He was born two years before Tiberius was made emperor. Gaius accompanied his father, mother and siblings on campaign in Germania, at little more than four or five years old. He had been named after Gaius Julius Caesar, but his father's soldiers affectionately nicknamed him "Caligula" ('little boot')
Caligula's sister, Agrippina the Younger, wrote an autobiography that included a detailed account of Caligula's reign, but it too is lost. Agrippina was banished by Caligula for her connection to Marcus Lepidus, who conspired against him. Caligula also seized the inheritance of Agrippina's son, the future emperor Nero. Gaetulicus flattered Caligula in writings also now lost. Suetonius wrote his biography of Caligula 80 years after his assassination, and Cassius Dio over 180 years after; the latter offers a loose chronology. Josephus gives a detailed account of Caligula's assassination and its aftermath, published around 93 AD, but it is thought to draw upon a "richly embroidered and historically imaginative" anonymous biography of Herod Agrippa, presented as a Jewish "national hero".286 Pliny the Elder's Natural History has a few brief references to Caligula, possibly based these on the accounts by his friend Suetonius, or an unnamed, shared source. Of the few surviving sources on Caligula, none paints Caligula in a favourable light. Little has survived on the first two years of his reign, and only limited details on later significant events, such as the annexation of Mauretania, Caligula's military actions in Britannia, and the basis of his feud with the Senate
Claudius, Tiberius Claudius Caesar Augustus Germanicus 1 August 10 BC – 13 October AD 54) was a Roman emperor, ruling from AD 41 to 54. A member of the Julio-Claudian dynasty, Claudius was born to Drusus and Antonia Minor at Lugdunum in Roman Gaul, where his father was stationed as a military legate. He was the first Roman emperor to be born outside Italy.
Nero Claudius Caesar Augustus Germanicus 15 December AD 37 – 9 June AD 68) was a Roman emperor and the final emperor of the Julio-Claudian dynasty, reigning from AD 54 until his death in AD 68.
Nero was born at Antium in AD 37, the son of Gnaeus Domitius Ahenobarbus and Agrippina the Younger (great-granddaughter of the emperor Augustus). Nero was three when his father died.1 By the time Nero turned eleven,2 his mother married Emperor Claudius, who then adopted Nero as his heir. Upon Claudius' death in AD 54, Nero ascended to the throne with the backing of the Praetorian Guard and the Senate. In the early years of his reign, Nero was advised and guided by his mother Agrippina, his tutor Seneca the Younger, and his praetorian prefect Sextus Afranius Burrus, but sought to rule independently and rid himself of restraining influences. The power struggle between Nero and his mother reached its climax when he orchestrated her murder. Roman sources also implicate Nero in the deaths of both his wife Claudia Octavia – supposedly so he could marry Poppaea Sabina – and his stepbrother Britannicus.
With his death, the Julio-Claudian dynasty ended. Chaos would ensue in the year of the Four Emperors.
During the era known as ancient Roman it became customary for all the senators, chief magistrates, and at last for the equites also, to wear seal status rings. The nature of their individual production meant that designs and details show a wide variety, though there are common themes, such as certain gods, which were especially popular.
The gallery contains photos of original Roman carved sculptures of the Goddess Athena { aka Minerva}, & the Emperor's Augustus, Tiberius, Caligula, Claudius and Nero
Every item is accompanied with our unique, Certificate of Authenticity. Of course any certificate of authenticity, given by even the best specialist dealers, in any field, all around the world, is simply a piece of paper,…however, ours is backed up with the fact we are the largest dealers of our kind in the world, with over 100 years and four generation’s of professional trading experience behind us read more
475.00 GBP

A Large & Superbly Impressive Circa 20 Million Year Old Megalodon Giant Shark Tooth
Miocene period and one of the largest we have seen in years.
Megalodon (Otodus megalodon), meaning "big tooth", is an extinct species of mackerel shark that lived approximately 23 to 3.6 million years ago (Mya), from the Early Miocene to the Pliocene epochs. It was formerly thought to be a member of the family Lamnidae and a close relative of the great white shark (Carcharodon carcharias). However, it is now classified into the extinct family Otodontidae, which diverged from the great white shark during the Early Cretaceous.
While regarded as one of the largest and most powerful predators to have ever lived, the megalodon is only known from fragmentary remains, and its appearance and maximum size are uncertain
Extrapolating from a vertebral column and reconstructing a 3D model with dimensions based on all extant lamnid sharks suggests that a 16-meter-long (52 ft) individual, but it may have been much larger than that compared to previous estimates, possibly reaching an excess 90 feet, and weighing 61.5 metric tons (67.8 short tons) or more, in body mass; and an individual megaladon of this size would have needed to consume at least 98,175 kcal per day.
Their teeth were thick and robust, built for grabbing prey and breaking bone, and their large jaws could exert a bite force of up to 108,500 to 182,200 newtons (24,400 to 41,000 lbf) with the ability to bite a whale in half with one bite.
The tooth is length top to bottom
As with all our items it comes complete with our certificate of authenticity read more
775.00 GBP
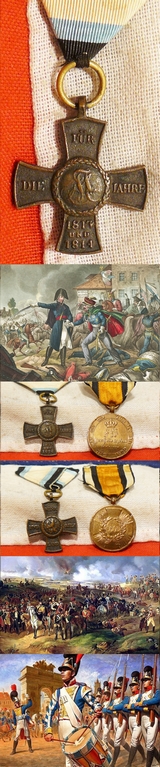
Most Rare, Original Pair of Napoleonic War Period Issued Medals, The Prussian & Bavarian Battle of Waterloo & Battle of Leipzig, One Made From Captured Cannon, Just as The British Victoria Cross Was Made From Captured Russian Cannon.
Really rare to find, but exceptionally good value when one considers the British equivalent for two original medals for the Napoleonic campaigns would be between five and ten times this price. The Prussian Campaign Medal for 1813, a cross within a circle, made from captured cannon, and the Bavarian Military Campaign Medal for the Napoleonic Wars in 1813, 1814, 1815, for Officers and Other Ranks, awarded in 1817-1818.
Prussian Medal; Circular bronze medal with loop for ribbon suspension; the face with a cross pattee with rays between the arms, the date 1813 centrally within a laurel wreath; the reverse with the crowned cypher of Friedrich Wilhelm III above the inscription Preusens tapfern kriegern (Prussia's brave warriors) circumscribed Gott war mit uns, Ihn sey die Ehre (God was with us To Him the Glory); the edge inscribed AUS EROBERTEM GESCHUTZ (from captured cannon); some surface wear; on an old correct ribbon. The medal was instituted by King Friedrich Wilhelm III at Frankfurt-am-Main on 24 December 1813 and amended on 3 October 1815 to be awarded to all warriors who without exception, whether in the field or before a fortress, truly fought and uncompromisingly did their duty throughout this current conflict? (jeden Krieger ohne Ausnahme, der im Felde oder vor einer Festung wirklich mitgefochten und der wehrend der Dauer des jetzigen Krieges seinen Pflichten treugeblieben ist). The medal exists with the dates 1813, 1814, 1813/1814 and 1815 and with square and rounded ends to the cross. Prussia was a key member of the coalition that fought Napoleonic France and its allies, culminating with victory at Waterloo on 18 June 1815. Bavarian medal; Bronze cross pattee alise with loop for ribbon suspension; the face with a circular central medallion bearing the cipher of King Maximilian I Joseph within an oak leaf border, the upper, left, right and lower arms inscribed FUR DIE JAHRE 1813 / UND / 1814 respectively; the reverse with a circular central medallion bearing the Bavarian lion on a lozenge ground within an oak leaf border, the upper, left, right and lower arms inscribed KONIG UND VATERLAND (King and Fatherland) respectively; on replaced correct ribbon. The Medal was instituted on 4 December 1814 and confirmed in statutes on 25 May 1817 to be awarded to Bavarian military who fought in the Napoleonic Wars. 16 June 1815
Wellington and Blucher meet at the windmill of Bussy at 1 pm, where they agree that Napoleon seems to be about to attack Ligny, not Quatre-bras. The Prussians take responsibility for this battle, but the 4th corps, headed by General von Bulow, doesn't arrive in time, and the 80,000-strong Prussian army loses the Battle of Ligny against Napoleon. Blucher is injured in the attack when his horse is shot from underneath him.
Later that same afternoon, the French Marshal Ney leads an attack at Quatre-Bras against the British, but the latter's superior numbers and French indecision allow them to avoid defeat.
17 - 18 June 1815
Though badly mauled on 16 June, Blucher retreats not east towards Prussia but re-establishes his position around Wavre (north and east from Ligny), thereby staying in contact with the allied force which had retreated from Quatre-Bras to Waterloo.
One of Wellington's ADCs reaches Blucher at 11 pm on 17 June, informing the Prussian general that the British general would fight a defensive battle at Waterloo. Blucher, after consultation with Gneisenau, resolves to send Bulow's 4th corps to attack the enemy's right flank. This would be followed by the 2nd corps, with the 1st and 3rd held in reserve. The 4th, 2nd and 1st corps march in two columns from Wavre towards the battlefield at Waterloo. Whilst Blucher was to hold the French off at Wavre, Bulow and Pirch II were to lead the left column (that which would finally take Plancenoit, to the rear of Napoleon's right) and Zieten on the right column would finally emerge onto the battlefield alongside Wellington's left round about 7 pm.
Though the battle at Plancenoit was to be hard fought, the Prussians eventually overrun the French right, causing the French army to turn and flee. Blucher was famously to meet Wellington on the battlefield between 9 and 10 pm, close to the Belle-Alliance farm, where the Prussian general used the only French he knew: 'Quelle affaire !' are the words that history has recorded.
Given the battering the Allied army had received throughout the day, the relatively fresh Prussian troops were to take the lead in pursuing the fleeing French troops. The Prussians had nevertheless lost 7,000 men. Napoleon's carriage was to be seized by Prussian cavalry at Gemappes, and the routed French were to be given no quarter by the furious Prussian pursuit. Blucher's advance guard was finally to reach the outskirts of Paris on 29 June. With Napoleon's abdication on 22 June, the war would officially end upon the signature of the Convention of St-Cloud on 3 July 1815. The Bavarian story from 1813 up to 15. King Maximillan I Josef turned with a heavy heart away from the French and changed to the Allied camp shortly before the Battle of Leipzig. The attempt by Wrede to stop the victory of the Grande Armee in 1813 at the Battle of Hanau ended in a narrow defeat for his Austro-Bavarian corps. The campaign of 1814 began badly for the Allies, but Wrede made up for his earlier defeat with valuable victories over his former allies at the battles of Arcis-sur-Aube and Bar-sur-Aube.
In 1814, the Bavarian army consisted of a Grenadier Guard regiment, 16 regiments of Line Infantry, two battalions of Jager, seven regiments of light cavalry (of which one was territorial), one regiment of Uhlans, two Hussar regiments, one regiment of Garde du Corps (mounted royal bodyguard), two regiments of foot artillery and one of horse-artillery.
In 1815, the 7th (National) Light Cavalry regiment was formed into two Cuirassier regiments. A very early pair of Napoleonic Wars Germanic Kingdom medals from the Napoleonic Wars. By comparison these medals are extremely inexpensive for the equivalent, British Waterloo medal is now anything up 8,000 plus depending on regiment etc..
The last photo in the gallery shows a photograph of one section of the collection in the museum of Waterloo, taken in around 1900, showing all the weapons of Waterloo en situ, including all the protagonists {British, French, Prussian and Belgian muskets, swords, pistols, armour uniforms, etc}. The museum was founded and owned by a veteran of the 7th Hussars that fought at Waterloo read more
1295.00 GBP

Early War M1910 Feldgrau & Wine Red Wool Cloth Lancer’s Mutze Representing the Colours of a Prussian Uhlans Lancers Regiment. The Very Same Type And Rare Colour Scheme worn by Corporal Adolf Hitler While Serving In The Trenches in WW1.
The very same form of Imperial German army cap worn by Adolf Hitler in WW1 see photos A rare survivor of early WW1 German trench warfare head dress of 1914. In super condition with no mothing. The cockades used during WW1 to represent the National colours and Prussian state was black and white, and the upper cockade, red, white and black.
The type of cap worn by Adolf Hitler is shown in a photo in the gallery wearing his very same type of cap, while serving as a gefreiter in the trenches in WW1. The infantry Mutze was adorned with two roundels (Kokarden) sewn one over the other. The upper Kokarde was known as the Deutsche or Reichs Kokarde, and it was painted in the national colors of red-white-black. The lower Kokarde was painted in the State colours and was known as the Landeskokarde. 1897 Reich's Kokarde
In 1897 a new Reich's Kokarde in Red/White/Black was introduced for all ranks to commemorate the 100th anniversary of the birth of Kaiser Wilhelm 1st. The Reich's Kokarde was to be worn on the right side of the Pickelhaube, and worn centered between the band and the top row of piping on Kratzchen (Feldmutze)The lower Kokarde was painted in the State colors and was known as the Landeskokarde, and is based in Schlesien - a Prussian State Because the Krätzchen was a vital link in the rather complicated unit colour-coding system, it had a wide-range of colour combinations for the band and piping. A wide coloured band in combination with piping at the cap’s top, and sometimes on the band, indicated the wearer’s branch, or in the cavalry’s case, regiment. It sounds simple, yet the almost endless colour-coding made it so complicated it had little utility. For example, all infantrymen would have a poppy red band and piping. Various shades of red band and piping would also apply to certain regiments of Dragoons, Uhlans, Schwere Reiter and Chevaulegers. Some cavalry regiments, such as Hussars and Cuirassiers, would have their own unique unit colour combination. Certain branches of the army would wear the identical colour combination, such as the technical branches, including engineers, field artillery and transport troops (black band with red piping). This cap has wine red coloured band and piping which usually denotes an Uhlan Regt. The cotton lining is good and complete but the interior wear marks have worn away the interior black regimental ink stamps.
Photos 7,8,& 9 in the gallery are of Corporal Hitler wearing his same cap. read more
495.00 GBP
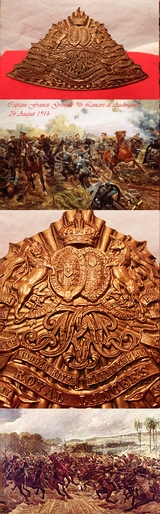
A Fine & Original Chapka Plate for the 9th Royal Lancers WW1 Issue
With all battle honours up to the Boer War. The last Lancer regiment to engage in Lance on Lance combat in WW1. The chapka was a type of helmet worn by 19th century Polish light cavalry and later adopted by another nations, including Britain.
During the Second Boer War, 1899-1902, the Lancers took part in the following actions: Belmont, Battle of Modder River, Magerfonstien, Relief of Kimberley, and the following Battle of Paardeberg which resulted in Cronje?s surrender. They provided Lord Roberts? escort for his state entry into Bloemfontein. After the war, the 9th returned to Sialkot in the Punjab Although engaged in combat for the whole of the war the Lancers only operated as a cavalry unit during 1914. This was due to the widespread use of machine guns and shelling and also the advent of the tank. For the remainder of the war they operated as infantry in the trenches.
Notable events included a Victoria Cross for Captain Francis Octavius Grenfell for his actions in saving the guns of 119th Battery, Royal Field Artillery on 24 August 1914 (he was later killed in action on 24 May 1915, as was his twin brother, Riversdale, a yeomanry officer who attached to 9th Lancers), and the regiment's participation in the final "lance on lance" action of the First World War on 7 September 1914 at Moncel in which Lieutenant Colonel David Campbell led a charge of two troops of B Squadron and overthrew a squadron of the 1st Guard Dragoons. After Campbell left on promotion he was replaced as commanding officer by Desmond Beale-Browne.
.
By the end of the war 274 Lancers had died.
In August 1914 Hume's regiment was in Belgium with the British Expeditionary Force (BEF). On 24 August during the Battle of Mons, they charged a large body of German infantry who were advancing to encircle the 5th Division at Audregnies. This famous action saw Captain Francis Grenfell win the Victoria Cross. The 9th Queen's Royal Lancers, or the Delhi Spearmen, were a cavalry regiment of the British Army. They are best known for their roles in the Indian mutiny of 1857, the WW1 Charge at Mons, and for their part in the North African campaign of World War II including the retreat to and the battle of El Alamein in 1942.The 9th Queen's Royal Lancers were originally formed during the Jacobite Risings in 1715. They were formed by Major-General Owen Wynne and were the second cavalry regiment in the British Army. They were initially known as the "9th Dragoons" or "Wynne's Dragoons". In 1717, the regiment embarked for Ballinrobe, in Ireland, and was placed on the Irish establishment.
In 1783 they converted into Light Dragoons, becoming the 9th Light Dragoons, and served in the Irish Rebellion of 1798, Sir Samuel Auchmuty's expedition to the River Plate in 1803, the occupation of Montevideo and Wellington's Peninsula War between 1811 and 1813.
In 1816 they were constituted Lancers and in 1830 were given the distinguished title of "Queen's Royal", in honour of Queen Adelaide, consort of William IV, hence becoming the 9th Queen's Royal Lancers.
The Lancers were first posted to India during the Gwalior Campaign of 1843. They subsequently took part in the First Anglo-Sikh War of 1845-46 and the Second Anglo-Sikh War of 1848-49 where they were often led by Sir Hope Grant and were the first recipients of the Bronze Star Medal.
During the Indian mutiny of 1857, the 9th Lancers earned the name the Delhi Spearmen, a name which is believed to have been given to them by the mutineers themselves. 9th Lancers was present in all three of the most notable events associated with the Indian mutiny, namely, the seizure of Delhi, the seizure of Lucknow and the relief of Lucknow. For their actions the Lancers were awarded twelve Victoria Crosses, more than any other cavalry regiment. They were described by an ally as:-
"The beau ideal of all that British Cavalry ought to be in Oriental countries". read more
295.00 GBP
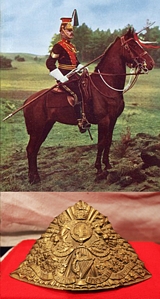
A Good Victorian Fifth Royal Irish Lancers Tchapka Helmet Plate
In superb condition, fabulous bronze patina and two helmet screw posts.Queen Victoria's crown. The regiment was originally formed in 1689 as James Wynne's Regiment of Dragoons. They fought in the Battle of the Boyne and at the Battle of Aughrim under William of Orange. Renamed the Royal Dragoons of Ireland, they went on to serve with the Duke of Marlborough during the Spanish War of Succession and earned three battle honours there.In 1751, they were retitled 5th Regiment of Dragoons and in 1756 the 5th (or Royal Irish) Regiment of Dragoons. As such, they served in Ireland and were active during the Irish Rebellion of 1798. However, they were accused of treachery; their accusers claimed their ranks had been infiltrated by rebels. (According to Continental Magazine, April 1863, the unit refused to attack a group of rebels.) This accusation appears to have been false, but nevertheless they were disbanded at Chatham in 1799. The regiment was reformed in 1858, keeping its old number and title, but losing precedence, being ranked after the 17th Lancers. It was immediately converted into a lancer regiment and titled 5th (or Royal Irish) Regiment of Dragoons (Lancers). In 1861, it was renamed the 5th (or Royal Irish) Lancers and then the 5th (Royal Irish) Lancers. The regiment served in India and a section served in Egypt in 1885, taking part in the battles at Suakin. It served with distinction in the Second Boer War from 1899 to 1902, gaining battle honours at Battle of Elandslaagte and The Defence of Ladysmith.
The regiment then returned to England where it stayed until the outbreak of World War I, when it became part of the British Expeditionary Force and saw action continually from 1914 to 1918 in some of the war's bloodiest battles. During the battle of Bourlon Wood George William Burdett Clare received the Victoria Cross posthumously. The 5th (Royal Irish) Lancers won a total of 20 battle honours during the Great War.
The 5th (Royal Irish) Lancers also has the grim honour of being the regiment of the last British soldier to die in the Great War. This was Private George Edwin Ellison from Leeds, who was killed by a sniper as the regiment advanced into Mons a short time before the armistice came into effect.
The regiment was renamed 5th Royal Irish Lancers and disbanded in 1921, but a squadron was reconstituted in 1922 and immediately amalgamated with the 16th The Queen's Lancers to become the 16th/5th Lancers The Royal Irish Lancers were in Mons at the time of retreat in 1914 but escaped and returned on Armistice Day. The last cavalry regiment out and the first back!. The memorial panel we show in the gallery records the return welcomed by the Maire and the Cur?. The scene is taken from a painting, ?5th Lancers, Re-entry into Mons?, last heard of in the private collection of a Belgian citizen. This in turn is almost a mirror image of a painting ?5th Lancers, Retreat from Mons? (whereabouts unknown). In the former, the troopers are heading in the opposite direction to the ?Retreat?, and a middle-aged priest and a pregnant woman watching the departure of the regiment among a worried-looking crowd of Belgian citizens have subtly changed: the priest is now white-haired and the mother holds up her four-year-old child, having lived through the occupation of the German forces in Mons for four years. The Great War 1914
The 5 Lancers, as part of the 3rd Cavalry Brigade, were heavily involved and played a major role in the initial mobile actions fought by the BEF. They gained the distinction of being the last cavalry regiment to withdraw from Mons during the retreat; they also had the privilege to be the first British regiment to re-enter Mons after the pursuit in November 1918. Generally the First World War is described as a war of trench deadlock primarily fought by the infantry, gunners and engineers, this assessment is correct. It must however be remembered that cavalry regiments were expected to take their place in the line from time to time and did share the privations of trench warfare suffered by the infantry. On a number of occasions 5 L particularly distinguished themselves: in the defence of Guillemont Farm, June 1917, 3 MCs, and 4 MMs were won and during the defence of Bourlon Wood in 1918 Private George Clare won a posthumous VC. While the main focus of the First World War remained with the armies fighting on the western front it was by no means the only theatre of war. In 1918 Allenby, a 5th Lancer and later a Field Marshal, reorganised British forces in the Middle East pushing his lines forward into northern Palestine. Allenby's Army broke through at Megiddo resulting in the collapse of Turkish resistance. 8.25 inches x 5 inches approx. read more
295.00 GBP

A Fine and Long, Saudi Arabian, Silver & Copper Alloy Dharia Jambiya 19th Century
A scarce jambiya to find as the smaller Omani and Yemeni types were made in far greater numbers over the past century.
A long bladed Dharia jambiya, with shbeyl hilt type, more within the short-sword size, with a flat beyd blade as opposed to the more frequently seen Omani dagger sized pieces. Late 19th century also called in the west a Wahhabi jambiya covered in geometrically patterned silver. A "Wahhabi jambiya" is a occidental collector's term. "Weapons of the Islamic World" by The King Faisal Centre, the Centre for Research & Islamic Studies categorises these by type, tribal or regional origin, not by religious sect.
Obviously jambiyas of this type were carried by Wahhabis and certain of the tribes they are associated with would be predominately Wahhabi.
These are from the Asir, Hejaz, Nejd (generally the South, West and Central Saudi Arabia) and were the origins and backbone of the "Ikwhan" which was of course Wahhabi. Dharia is the term used to describe the long dagger which originates from the west of modern day Saudi Arabia, around the Azir/Hijaz area, and down as far as Yemen.
The word Dharia appears to come from the Arabic Dhura'eyah which translates as Arm Long Dagger. These daggers are also called Sabiki, Sabak, Sabik etc depending on the spelling. The term Wahabite is also commonly used to describe these, but any direct connection with the Wahhabi Movement except perhaps the actual geographical area is likely very co-incidental, and perhaps that this style was one used by them.
The jambia was given its name because it is worn on the side of a person – the word jambia is derived from the Arabic word janb (Arabic: جنب, lit. 'side'). A jambia is constituted of a handle, a blade, and a sheath in which the blade is held. It is made of a certain sort of wood, to hold the blade that is fixed to the waist from underneath with an upward curved sheath. The belt that holds the jambia is made of tanned leather, or some thick cloth. There are specialised markets and handicraft markets that decorate it with golden wires.
The jambia handle often tells of the social status of the man who wears it. Jambias can be made with ivory handles or hilts of other rare and exotic materials.
T. E. Lawrence was famous for using a jambiya knife historically. read more
1100.00 GBP