WW1 / WW2 / 20th Century


A Near Mint British Royal Naval Offcer's Sword King George VIth Hilt and Mounts With The Upgraded Wilkinson Sword 1952-53 Deluxe Elizabeth IInd Coronation Blade, Of Mirror Bright & Frosted Polish. With Original Geo VIth Sword Knot
Made and used in WW2, and upgraded by Wilkinson sword for the new Queen, Her Late Beloved Majesty Queen Elizabeth IInd, in 1952-53, and it is still perfectly serviceable for current service for the Royal Navy of HM King Charles. Named hilt for R. Shelley RN. also with its leather service transit storage badge monogrammed R.S.
Near mint gilt hilt bearing the King's crown, with original gilt wire binding over shark's skin grip, with a deluxe fully etched blade with King George VIth's crown surmounted traditional fouled anchor, and Queen Elizabeth's crown and cypher on the opposite side of the blade. The hilt is now the current service cypher for H.M.King Charles IIIrd.
The original Royal Naval officer's pattern sword was designed in 1805, and although most elegant in design it proved somewhat impractical and was replaced in 1827 by the more robust solid hilt variant.
In 1846 the Royal Naval blade was standardised for all Royal Naval officers, with the current lighter, straight single-edged blade being commissioned into service in 1929.
During World War I, the Royal Navy's strength was mostly deployed at home in the Grand Fleet, confronting the German High Seas Fleet across the North Sea. Several inconclusive clashes took place between them, chiefly the Battle of Jutland in 1916. The British fighting advantage proved insurmountable, leading the High Seas Fleet to abandon any attempt to challenge British dominance. The Royal Navy played an important role in securing the British Isles and the English Channel, notably ferrying the entire British Expeditionary Force to the Western Front without the loss of a single life at the beginning of the war.
The Royal Navy nevertheless remained active in other theatres, most notably in the Mediterranean Sea, where they waged the Dardanelles and Gallipoli campaigns in 1914 and 1915. British cruisers hunted down German commerce raiders across the world's oceans in 1914 and 1915, including the battles of Coronel, Falklands Islands, Cocos, and Rufiji Delta, among others
At the start of World War II in 1939, the Royal Navy was still the largest in the world, with over 1,400 vessels. The Royal Navy provided critical cover during Operation Dynamo, the British evacuations from Dunkirk, and as the ultimate deterrent to a German invasion of Britain during the following four months. The Luftwaffe under Hermann Göring attempted to gain air supremacy over southern England in the Battle of Britain in order to neutralise the Home Fleet, but faced stiff resistance from the Royal Air Force. The Luftwaffe bombing offensive during the Kanalkampf phase of the battle targeted naval convoys and bases in order to lure large concentrations of RAF fighters into attrition warfare. At Taranto, Admiral Cunningham commanded a fleet that launched the first all-aircraft naval attack in history. The Royal Navy suffered heavy losses in the first two years of the war. Over 3,000 people were lost when the converted troopship Lancastria was sunk in June 1940, the greatest maritime disaster in Britain's history. The Navy's most critical struggle was the Battle of the Atlantic defending Britain's vital North American commercial supply lines against U-boat attack. A traditional convoy system was instituted from the start of the war, but German submarine tactics, based on group attacks by "wolf-packs", were much more effective than in the previous war, and the threat remained serious for well over three years.
Warship Commands listed for Capt Richard Shelley, RN, {promoted Rear-Admiral 1944.}
HMS Erebus Capt. Monitor 11 Nov 1939 3 Feb 1940
HMS Suffolk Capt Heavy cruiser convoy service 23 Jun 1942 7 Feb 1944
Operation EV, convoy operations to and from northern Russia, convoy's PQ 18 and QP 14.
Convoy QP 15.
This convoy departed the Archangelsk on 17 November 1942
Combined convoy WS 30 / KMS 15.
This combined convoy was formed off Oversay on 19 May 1943. The convoy was divided into convoys
WS 30 and KMS 15 at sea on 25 May 1943.
Convoy CM 43.
Convoy US 22.
This convoy departed Fremantle on 30 August 1943.
Convoy US 23. read more
Price
on
Request

North Vietnamese Army Mortar KM-1 Rocket Artillery Level With Leather Pouch
Issued to the so-called Vietcong {a US army made up term for the North Vietnamese soldiers} crews for indirect fire rocket artillery weapons for adjusting their barrel toward the proper angle.
The North Vietnamese often sourced these rocket instruments from a few friendly government suppliers, mostly Soviet Russia, but the Soviet ones had screw fixings to the dial and cyrillic markings. This one has a plain dial, with no lettering, thus, possibly from a source country that was not keen for America to know it was making military equipment for North Vietnam. read more
Price
on
Request
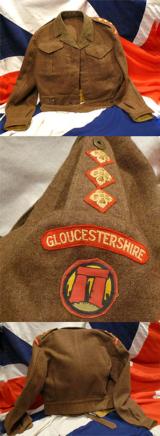
Most Rare Original Officer's Battledress Tunic WW2 Issue, For Capt Devos Gloucestershire Regt. Special Forces and Intelligence Officer
Acquired as part of a single officer's WW2 special forces kit of Capt. Devos.
He served in the war in France and Germany {possibly elsewhere} and was promoted through to Lt. In 1944, and Capt. in early 1945. His officer's tunic denotes he was in the Gloucestershire Regt. His tunic is named, as are all his special forces, secret intelligence, and weapons training manual etc. plus his other kit and FS commando knife.. Also it came with an early war Brodie helmet with Div. Flash tricolour of red whit and blue. His tunic is a super piece, {with some old past mothing} with all his wartime patches etc.
We also had his Sam Browne with a .45 cal holster that has been cut and customised for quicker draw. Plus his '42 dated canvas belt and '43 dated holster. Compass pouch dated '42.
We are selling all as separate lots as not all collectors collect all things. His intelligence service document portfolio is shown in the gallery {now sold}
Most of his kit is now sold, only this tunic remains and has been offered for sale last. read more
395.00 GBP
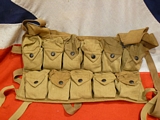
A Really Scarce WWI US Army 'Doughboy' Canvas Webbing Grenade Vest Pack Dated 1918. In Superb Condition.
Made by the Troy Carriage Sunshade Co. May 1918. 11 flap pockets in excellent condition. US inspector stamped.
Original American Army service kit of WW1 is really rare in the UK, and this is a superb example.
"Doughboy" was a popular nickname for US infantry soldiers, particularly during World War I. The origin of the term is debated, but it's widely believed to stem from the Civil War, possibly referencing the large brass buttons on uniforms or a practice of using clay to whiten uniform piping. Regardless of the exact origin, "Doughboy" became the common nickname for American soldiers in WWI, especially those serving in the American Expeditionary Forces (AEF).
According to the "Manual for Hand Bombers and Rifle Grenadiers", published in July 1918,
The number of grenades which can be carried by each man will be determined by the distance he has to travel, the condition of the ground and the general physique of the man. These points demand the most careful consideration, as the overloading of the men has frequently had disastrous results.
The following approximate numbers are given as a guide:
Hand Bomber Section
(a) Scouts, throwers and N.C.O.'s, each man 7 grenades
(B) carriers, each man 14 grenades
Rifle Grenadier Section
(a) Rifle grenadier, each 7 grenades
(B) Rifle grenadier carrier, each 14 grenades
All other infantrymen taking part in the
attack, each man 2 Rifle or hand grenades
Carrying parties, each man 14 grenades read more
120.00 GBP

Original British Army Paras Issue, 1959 Pattern, Parachute Regt. Warrant Officer's Denison Smock. Made For Government Contract By B.M.C. 1964. Operation Banner & Falklands War Period
One of two smocks from the same Para. Named to the WO who served between 1964 into the 80's. The first smock we sold immediately, and this we are offering was his second.
For campaign service used from Northern Ireland, in Operation Banner, to the Falklands War,
Operation Banner was the code name for the British military operation in Northern Ireland, lasting from 1969 to 2007, during the period known as the Troubles. It was the longest continuous deployment in British military history, involving over 300,000 personnel. The operation aimed to support the Royal Ulster Constabulary (RUC) in maintaining law and order amidst sectarian violence and political instability.
In 1982, the battalion was part of the force sent to the South Atlantic in Operation Corporate, as part of 3 Commando Brigade during the Falklands War. The battalion's men were the first troops from the main assault body to land on the Falkland Islands. The landing was on the shore at San Carlos Water (codename: Blue Beach). The battalion's first battle was the Battle of Goose Green on 28 May. This was followed by the Battle of Wireless Ridge and then the recapture of Port Stanley.
The Battle of Goose Green (Spanish: Batalla de Pradera del Ganso) was fought from 28 to 29 May 1982 by British and Argentine forces during the Falklands War. Located on East Falkland's central isthmus, the settlement of Goose Green was the site of a tactically vital airfield. Argentine forces were located in a well-defended position within striking distance of San Carlos Water, where the British task force had positioned themselves after their amphibious landing.
The main body of the British assault force was composed of the 2nd Battalion Parachute Regiment (2 PARA), commanded by Lieutenant-Colonel Herbert Jones. However, the BBC Radio broadcast news of the imminent attack on Goose Green, and the assault had to be urgently brought forward. Some, thus believe the BBC consider news more important than British service personnel’s lives. The BBC informing the world that the Argentine bombs were failing to detonate against UK ships due to wrong timing settings within the bombs was another subjective confirmation of this belief, once the Argentine forces changed their settings accordingly, and they then sunk our vessels successfully. Needless to say the BBC denied their assistance to Argentina brought about any unnecessary slaughter to our armed forces.
Knowing that this had likely forewarned the Argentinian defenders, the broadcast resulted in immediate criticism from Jones and other British personnel.
After the attack began in the early hours of 28 May, the 2 PARA advance was stalled by fixed trenches with interlocking fields of fire. Jones was killed during a solo charge on an enemy machine-gun post. The Argentinian garrison agreed to a ceasefire and formally surrendered the following morning. As a result of their actions, both Jones and his successor as commanding officer of the battalion, Major Chris Keeble, were awarded medals. Jones received a posthumous Victoria Cross, and Keeble received the Distinguished Service Order.
Just some of the history of the Parachute Regiment;
The 1st Battalion can trace its origins to 1940, when No. 2 Commando trained as parachutists. In 1941, the battalion was assigned to the 1st Parachute Brigade which also included the 2nd and 3rd battalions. The 1st Parachute Brigade was part of the 1st Airborne Division and remained with it throughout the war.
The battalion took part in operations in Tunisia in late 1942 to May 1943, suffering heavy casualties. The battalion and the brigade took part in Operation Fustian, when the Allies invaded Sicily and, again, suffered heavy casualties and was withdrawn to England in late 1943 to train and prepare for the Allied invasion of France. The battalion wasn't used in the initial invasion on 6 June 1944, D-Day, but was held back in the UK in reserve in case any of the five invasion beaches encountered serious difficulties and needed support. The plan turned out not to be required. During the fighting in Normandy numerous plans to drop the 1st Airborne were formed, none of which came to fruition. Finally, in September 1944, the battalion dropped into Arnhem the Netherlands with the rest of the 1st Airborne Division, as part of Operation Market Garden, where they suffered extremely heavy casualties and never saw combat again for the rest of the war.
After the war the battalion was reconstituted in 1946, and affiliated to the Brigade of Guards and served with the 6th Airborne Division in Palestine. It was disbanded in 1948, only to be reformed by the renumbering of the 4th/6th Battalion. The battalion was part of Operation Musketeer in 1956.
In the 1970s, the battalion first deployed to Northern Ireland in Operation Banner.
The battalion was involved in the NATO operation in Kosovo in 1999, Operation Agricola. In 2003, they were deployed to the Persian Gulf for Operation Telic in Iraq where despite overwhelming odds, two multiples of No. 8 platoon managed to fight their way out of the town of Majar al-Kabir. The Denison smock (or Smock, camouflage on later garments) remained on inventories in Commonwealth and other militaries after the Second World War, and was popular with troops in Korea. It remained standard combat dress for the Royal Marines and the Parachute Regiment until the mid-1970s . 1959 Para Smock Denison parachutist smock fish tail flap date 1964 size 1 knitted cuffs Beginning in 1959 the Denison smock was redesigned and the brushstroke pattern reconfigured. The 1959 pattern smock camouflage (and those produded thereafter) has a distinctively different look to it than the earlier Denisons, with a lighter and more prominent background, incorporating only two additional colours (usually brown and green) to create the basic brushstroke overprint. (WW2 era Denisons were darker and often appeared to incorporate more than two colours due to the blending and mixing of dyes that occurred during the application process.) These smocks were produced into the 1970s, and despite the standardization in manufacturing and printing technique, they still show much variation in colour and hue depending on when they were produced. The 1959 pattern Denison smock was worn primarily by members of the Parachute Regiment in theatres such as the Suez and Ulster (Northern Ireland), although there is evidence to suggest it was also issued in limited quantities to the Royal Marines (RM). and worn by British Special Forces , and US Special Forces in vietnam war too. The Denison smock (or Smock, camouflage on later garments) remained on inventories in Commonwealth and other militaries after the Second World War, and was popular with troops in Korea. It remained standard combat dress for the Royal Marines and the Parachute Regiment until the mid-1970s (see below), and changed little from the wartime issue. A full length brass zip had become standard - with no cloth flap to cover it - and the ever-popular knitted cuffs (deleted on the 2nd Pattern smock, but often imitated by sewing woollen sock tops to the cuffs), were reintroduced. The base colour of the camouflage pattern was now a lighter khaki shade. The "Newey" press studs changed from brass/copper to nickel-plated versions.
The 1959 Pattern Denison Smock.
The Denison was significantly modified in the 1959 Pattern. This had a higher hem line, and was much less baggy. This was because wearing it over the personal carrying equipment (but under the parachute harness) while parachuting was no longer the practice. The '59 Pattern retained the full length zip and knitted wool cuffs, but the flannel lining of the collar was changed from khaki to light green. The most obvious difference to the eye, however, was the change in pattern and colours of the camouflage. The pattern became less random, more defined, with broad, vertical brush-strokes, and greater contrast between the base light khaki and the overprinted tones. The green was much darker than previous versions, and the brown was now chocolate, rather than brick. Where green and brown overlapped, they formed a fourth, darker, olive brown colour.
The name of its wearer is confidential but will be passed to the next owner. read more
595.00 GBP

WW2 Luftwaffe Combat Bomber Clasp (Frontflugspange für Kampf- und Sturzkampfflieger in Gold)From One Of Ian Fleming’s Naval Intelligence Section’s So Called ‘Red Indians’ 30 Commando Special Engineering Unit. Collected During A Clandestine Recon Mission
(Frontflugspange für Kampf- und Sturzkampfflieger in Gold). Constructed of gilded zinc, for 110 missions, the obverse consisting of a central circular laurel leaf wreath, joined together at the bottom by a swastika, surrounding a central winged bomb executed in silvered tombak, flanked on each side by nine oak leaves, the reverse with a single visible rivet securing the bomb in position, with a crimped barrel hinge and tapering horizontal pinback meeting a flat wire catch emanating from a crimped base, maker marked with the maker mark and address of Richard Simm & Söhne, Gablonz,
The Front Flying Clasp was instituted on January 30, 1941, by Hermann Göring.
It was awarded to recognize the bravery and service of Luftwaffe aircrew, heavy, or medium fighters and dive bombers, during World War II.
The Bomber Clasp specifically recognized the achievements of pilots and crew flying bomber aircraft.
The Front Flight Clasp was awarded in bronze for 20 front-line flights, in silver for 60 front-line flights, and in gold for 110 front-line flights . Upon awarding a higher rank, the previously worn clasp had to be removed. The award was worn on the left breast pocket, directly above the medal bar .
A highly desirable original collectors item, uncleaned unpolished, kept just as is, untouched and unmolested for the past 80 years
Originally taken by a commando of 30 commando X troop while on clandestine missions as part of 30 Commando reconnaissance and sabotage.
The brain child of naval commander Ian Fleming & Lord Louis Mountbatten, 30 {30AU} Commando, this wartime unit was a secret well kept for over 50 years after the war by the Official Secrets Act, some remains classified, see Reading. At the time, officially, they didn’t exist. The members of this unit were forbidden to discuss or document their activities, a pledge that many of the men kept even many years after the war was over, or even for their entire lives!
Due to the fact these men operated in very small groups on ‘need-to-know’ basis it is very difficult to get clear picture of everything they were doing.
Fleming’s/NID30AU secretary Miss Margaret Priestley (a history professor from Leeds University) played a vital role in the running and administration of 30AU and became his inspiration for Miss Petty Pettaval - the original character name that became Miss Moneypenny.
As revealed here for the first time!(6) (see Beau Bête)
Miss Preistley transferred over to NID30AU during the winter of 1943-44 from DNR - (Department of Naval Research) where she worked as a civilian, although there were obvious links between DNR and NID30AU as intelligence on enemy targets was collected for Fleming’s ‘Black List’.
Also Known as:
Fleming himself referred to the men of the unit as behaving like 'Red Indians'. (A reference he also used when referring to his character, James Bond, four times in his first novel Casino Royale. Which effectively makes this unit the ‘literary James Bond’s wartime unit’.)
Formerly:- (NID30 Command Office at Admiralty),
Special Engineering Unit.
'RED' Marines.
Latterly:- 30 Assault Unit,
30 Advanced Unit, 30AU
and incorrectly as 30th Assault Unit.
The number '30' was used for no better reason than it was NID/Miss Priestley’s Office Door number at the Admiralty. (Fleming’s Office was No. 39) 'Assault Unit' was 'overt' cover for the fact that they were intelligence gathering.
Date Founded: 30 September 1942
Date Disbanded: 26 March 1946
Date Reformed: February 2010 - 30 Cdo IXG
Mission When Founded:
The collection of technical intelligence and personnel from enemy headquarters and installations. Ahead of allied advances and before enemy could destroy it, to ‘Attain by Surprise’.
30 Commando consisted of Royal Marine, Army and Royal Navy elements that were organised into three Sections: No. 33, No. 34 and No.36 respectively. Initially code-named the Special Engineering Unit, the unit reported to the Chief of Combined Operations, though the Admiralty retained ultimate control of No.36 Section. No.35 Section was left vacant for the RAF to utilise but they never raised a troop to participate in 30 Cdo. Although they did supply intelligence officers and specific targets to pursue after D-Day for ‘Operation Crossbow’.
Unit members were given general commando skills and weapons training, and were then trained in recognising enemy mines, booby traps, handling of explosives, demolitions, counter-demolitions, recognition of enemy uniforms and equipment. Parachute training, small boat handling, recognition of enemy documents, search techniques including lock picking and safecracking, prisoner handling, photography and escape techniques were also taught.
A significant number of the initial recruits were formerly policemen. Although at least one ‘expert’ was recruited straight from prison, thought by the police to be the best safe-breaker in England at the time.
30 Cdo’s operational tactic was to move ahead of advancing Allied forces, or to undertake covert missions into enemy territory by land, sea or air, to capture intelligence, in the form of equipment, documents, codes or enemy personnel. 30 Cdo often worked closely with the Intelligence Corps' Field Security sections. More often than not each team consisted of two special operations Jeeps (As used by the SAS and 30AU) manned by one Naval Commander in possession of a ‘Black Book’ which listed targets from Ian Fleming’s famous ‘Black List’. The Naval Commander was the only man in each team who knew where and what the targets actually were. This Naval Commander was usually accompanied by at least one weapons expert or scientist who he relied on to evaluate the information or equipment they encountered. There were also usually at least six Royal Marines and one RM Officer whose main job was to do any fighting required and to keep the Naval Commander and any experts alive and out of trouble. (For details Reading section.)
The individual Sections served in all the Mediterranean and NW European operational theatres, usually operating independently, gathering information from captured facilities. The unit served in North Africa, the Greek Islands, Norway, Pantelleria, Sicily, Italy, and Corsica, 1942-1943 as 30 Commando.
s the Allies broke through 30AU split into many ‘Field Teams’ and these were responsible for capturing many and varied targets throughout Germany.
Team 2 under Curtis captured Prof. Helmut Walter, designer of the Me163 Rocket Plane and Midget Submarines at Kiel. (Kept by the British!).
Team 5 under USN Lambie captured Prof. Herbert Wagner (10) (Handed to US Agents) designer of the guided flying bomb Hs293, already used to sink HMS Egret and to kill over 1000 troops on HMT Rohna. He went on to work for the US Navy. He did not surrender in Bavaria with Dornberger and the von Braun brothers as the Allied military would have us believe. (2) (see Reading section).
The capture of Prof. Magnus von Braun (Martin) V2 fuel chemist. (Handed to US Agents). He did not surrender in Bavaria as the Allied military want us to believe. (see Reading for details)
The capture of the designer of the Nazi V2 (who went on to the NASA Saturn V), Prof. von Braun and his brother. (Some men were convinced they were some of the scientists they caught!) Did they surrender in Bavaria as the Allied military want us to believe or was that staged afterwards? (see Beau Bête for details and FREE preview PDF, in Reading)
Team 55 under Glanville captured the entire Nazi Naval records collection at ‘Tambach Castle’. (1)
Team 4 under Job(e) captured the Bremen dockyards with type 21 & 25 submarines and destroyers. Then took the surrender of Bremerhaven and captured Naval HQ SS Europa and Z29 Destroyer. (1)(All handed over to US Agents).
Team 2 Postlethwaite captures the Torpedo testing facility at Ekenförde. (1)
Another team captured Admiral Dönitz (as Führer).
And many other things yet to be revealed by the government!
Every single item from The Lanes Armoury, Britain's most famous, favourite, and oldest original Armoury Antique store, is accompanied by our unique Certificate of Authenticity. Part of our continued dedication to maintain the standards forged by us over the past 100 years of our family’s trading, and thus, it is a lifetime guarantee.
Ref; https://www.30au.co.uk
An amazing historic collection of information, including. https://www.amazon.co.uk/Beau-B%C3%A9te-assigned-Flemings-intelligence/dp/B08R7XYHXW read more
650.00 GBP

Now Sold A Really Rare Original WW2 Luftwaffe Night Fighter Airbase Command Commandant's {Fliegerhorst Kommandantur} of Stade, Double Sided Banner, Of A WW2 Night Fighter Luftwaffe Airbase For Nachtjagdgeschwader 1 {NJG 1} & Nachtjagdgeschwader 3 {NJG 3}
A most worthy candidate as the centrepiece of any, important or significant collection of original WW2 German Third Reich war trophies, captured by allied soldiers at the close of WW2. A representation of all the sacrifices made by the allied armed forces that fought and died to successfully destroy the Third Reich war machine.
Nachtjagdgeschwader 1 (NJG 1) was a German Luftwaffe night fighter-wing of World War II. NJG 1 was formed on 22 June 1940 and comprised four Gruppen (groups). NJG 1 was created as an air defence unit for the Defence of the Reich campaign; an aerial war waged by the Luftwaffe against the bombing of the German Reich by RAF Bomber Command and the United States Air Force. In 1941 airborne radar was introduced with radar operators, and standardised in 1942 and 1943. Consequently, a large number of German night fighter aces existed within NJG 1.
Nachtjagdgeschwader 3 (NJG 3) was a Luftwaffe night fighter-wing of World War II. NJG 3 was formed on 29 September 1941 in Stade from Stab./Zerstörergeschwader 26. Pilots of NJG 3 claimed approximately 820 aerial victories by day and night.
Measuring 19 inches wide and 15 inches tall, both sides of the banner feature yellow fields trimmed in silver ribbon and 2 1/4 inch long silver wire fringe. One side in silver bullion lettering has the text.
Just one of the fighter aces was Oberst Günther Radusch (11 November 1912 – 29 July 1988) was a World War II German Luftwaffe pilot and wing commander. As a fighter ace, he claimed 65 enemy aircraft shot down in over 140 combat missions. He claimed one victory in the Spanish Civil War. During World War II, he was credited with 64 aerial victories in Defense of the Reich all of which claimed at night and includes the destruction of 57 four-engined bombers.
Stade airfield (German: flugplatz Stade or Fliegerhorst Stade) was an airfield 285 west-northwest of Berlin.
It's construction began in the spring of 1935, disguised as a civilian project. The first occupants arrived as early as October 1935 when the first students of the Fliegerersatzabteilung 47 (Pilot Replacement Unit 47) began their course. First use was that of a multi-engine piloting school in 1936 and a second training unit arrived at the airfield in 1937 from Ludwigslust, bringing their Junkers Ju52 and Ju86, Dornier Do17, Focke-Wulf Fw56 and Fw58 aircraft. In 1939 a new large hangar and the first concrete runway (Startbahn II) was built.
After the beginning of the war in 1939, the training units were withdrawn to the east in Brandenburg. In November, they were replaced with night fighters,
In April 1940, air transport aircraft filled with parachutists and mountain troops flew from Stade to begin the occupation of Norway.
In 1941, night-fighters of II./NJG1 were stationed here, making Stade an important part of the defense against Alllied strategic bombers. Although II./NJG1 left after some time, Stade was never really long without nightfigthers after this first prolonged stay. It is during this period that the second runway (Statbahn III) was built. Construction of the Northerly runway ('Startbahn I') was begun, but for unknown reasons it was never completed.
Allied attacks upon Stade;
22 Apr 44: strafed by VIII Fighter Command P-51 Mustangs – claimed 1 x Me 210 and 1 x Ju 88 destroyed, plus 2 x He 111s damaged.
18 Jun 44: bombed by 45 B-24 Liberators. (445th Bomb Group Mission 103 – 45 B-24s dropped 520 x 100 lb. AN-M30 General Purpose bombs)
06 Oct 44: bombed by 29 B-24s.
31 Dec 44: bombed by 13 B-17 Fortresses – 5-6 night fighters destroyed or damaged, 2 hangars burned out and at least one runway cratered.
03 Feb 45: low-level attack by VIII Fighter Command P-51s – claimed 1 x He 111 destroyed and 2 more damaged.
09/10 Apr 45: bombed by 22 RAF Halifaxes and 14 USAAF B-24s in a joint night attack.
18 Apr 45: strafed by RAF Tempests – claimed 2 x Do 217s and 1 x Fw 190 destroyed plus other aircraft damaged. Same date, demolition of the airfield began and unserviceable aircraft destroyed.
01 May 45: occupied by 2nd Battalion Welch Guards.
Stade Operational Units: 10./JG 26 (Nov-Dec 39); Stab/JG 1 (Dec 39 – May 43); II./ZG 1 (Feb 40); I.(Jagd)/LG 2 (Feb-Mar 40); KGr. z.b.V. 104 (Mar-May 40); II./JG 52 (Sep 40); I./JG 27 (Oct 40); II./JG 51 (Oct 40); 3./JG 54 (Oct-Nov 40); Stab/ZG 26 (Sep 41); Stab/NJG 3 (Sep 41 – Apr 45); III./NJG 3 (Nov 41 – Aug 44), II./JG 1 (Feb 42); Luftbeobachterstaffel 2 (Oct 43 - Jun 44); Stab/JG 302 (Nov 43 – Jan 44); III./JG 76 (Jul-Aug 44); I./JG 26 (Apr 45).
School Units: FFS C (twin-engined conversion school) Stade (Nov 37 - Sep 39); Stab and I./Flieger-Ausb.Rgt. 42 (Apr 39 - Jan 40); Bombenschützenvorschule Stade (1940); Flieger-Techn.Schule 2 (1940-43).
Replacement Units: Flieger-Ers.Abt.14 (Oct 35 – Sep 37); Flieger-Ers.Abt.42 (Nov 38 – Mar 39); III./Fallschirmjäger-Ers.-u.Ausb.Rgt. 4 (c.Jan 45 - ? ).
On 18 April 1945 all flyable aircraft were flown to Uetersen, the remainder and the facilities were destroyed. The occupation by the British from 1 May 1945 left some surprises for the British: due to the fast Soviet advance, the commander of the E-Stelle (Erprobungsstelle or "Evaluation Unit") at Werneuchen) was ordered by the Oberkommando dere Luftwaffe (OKL) to evacuate equipment to Stade. As a result, the British discovered amongst others a camouflaged and incomplete Ju-248 V.1 prototype (a reworked Me163 rocket powered interceptor with landing gear instead of a retractable skid) at the airfield.
The Fighter aces of NJG 3;
Helmut Lent
Heinrich Prinz zu Sayn-Wittgenstein
Guenther Radusch
Walter Borchers
Paul Zorner .
Gerhard Raht
Martin Drewes
Werner Hoffmann
Egmont Prinz zur Lippe-Weissenfeld
Hans-Joachim Jabs
Rudolf Frank
Helmut Bergmann
Werner Husemann
Hubert Rauh
Paul Szameitat
Hans Krause
Rudolf Sigmund
Alfons Koster
Alfred Kuhne
Arnold Doring
Reinhold Eckardt
Erhard Peters
Wilhelm Schmale
The closest example of such a historical one as this is one for another airbase commandant that was sold in America in 2017 at RIA est $12,000 to $14,000. That one had its hanging pole, but just like ours, in pretty much identical superb condition, with no damage all braiding present, no fading at all. Both are exactly the same size. See photo 9 in the gallery
RIA Rock Island Auction is the likely most important militaria auctioneers, for the rarest of all forms of militaria, in the US, if not the world. read more

WW2 German Luftwaffe Reconnaissance & Air/Sea Rescue,Clasp From One Of Ian Fleming’s Naval Intelligence Section’s So Called ‘Red Indians’ 30 Commando Special Engineering Unit. Collected During A Clandestine Recon Mission At An Airbase
Luftwaffe recon clasp in silver. Early war solid nickel silver clasp with nickel silver riveted eagle head. Top ‘Frontflugspange für Aufklärer in Silber’
Instituted January 30, 1941, the Clasp for Reconnaissance, Air/Sea Rescue, and Meteorological Squadrons in silver was awarded for specialized squadrons in the Luftwaffe and even Kriegsmarine upon the completion of sixty combat missions.
A highly desirable original collectors item, uncleaned unpolished, kept just as is, untouched and unmolested for the past 80 years
Originally taken by a commando of 30 commando X troop while on clandestine missions as part of 30 Commando reconnaissance and sabotage.
The brain child of naval commander Ian Fleming & Lord Louis Mountbatten, 30 {30AU} Commando, this wartime unit was a secret well kept for over 50 years after the war by the Official Secrets Act, some remains classified, see Reading. At the time, officially, they didn’t exist. The members of this unit were forbidden to discuss or document their activities, a pledge that many of the men kept even many years after the war was over, or even for their entire lives!
Due to the fact these men operated in very small groups on ‘need-to-know’ basis it is very difficult to get clear picture of everything they were doing.
Fleming’s/NID30AU secretary Miss Margaret Priestley (a history professor from Leeds University) played a vital role in the running and administration of 30AU and became his inspiration for Miss Petty Pettaval - the original character name that became Miss Moneypenny.
As revealed here for the first time!(6) (see Beau Bête)
Miss Preistley transferred over to NID30AU during the winter of 1943-44 from DNR - (Department of Naval Research) where she worked as a civilian, although there were obvious links between DNR and NID30AU as intelligence on enemy targets was collected for Fleming’s ‘Black List’.
Also Known as:
Fleming himself referred to the men of the unit as behaving like 'Red Indians'. (A reference he also used when referring to his character, James Bond, four times in his first novel Casino Royale. Which effectively makes this unit the ‘literary James Bond’s wartime unit’.)
Formerly:- (NID30 Command Office at Admiralty),
Special Engineering Unit.
'RED' Marines.
Latterly:- 30 Assault Unit,
30 Advanced Unit, 30AU
and incorrectly as 30th Assault Unit.
The number '30' was used for no better reason than it was NID/Miss Priestley’s Office Door number at the Admiralty. (Fleming’s Office was No. 39) 'Assault Unit' was 'overt' cover for the fact that they were intelligence gathering.
Date Founded: 30 September 1942
Date Disbanded: 26 March 1946
Date Reformed: February 2010 - 30 Cdo IXG
Mission When Founded:
The collection of technical intelligence and personnel from enemy headquarters and installations. Ahead of allied advances and before enemy could destroy it, to ‘Attain by Surprise’.
30 Commando consisted of Royal Marine, Army and Royal Navy elements that were organised into three Sections: No. 33, No. 34 and No.36 respectively. Initially code-named the Special Engineering Unit, the unit reported to the Chief of Combined Operations, though the Admiralty retained ultimate control of No.36 Section. No.35 Section was left vacant for the RAF to utilise but they never raised a troop to participate in 30 Cdo. Although they did supply intelligence officers and specific targets to pursue after D-Day for ‘Operation Crossbow’.
Unit members were given general commando skills and weapons training, and were then trained in recognising enemy mines, booby traps, handling of explosives, demolitions, counter-demolitions, recognition of enemy uniforms and equipment. Parachute training, small boat handling, recognition of enemy documents, search techniques including lock picking and safecracking, prisoner handling, photography and escape techniques were also taught.
A significant number of the initial recruits were formerly policemen. Although at least one ‘expert’ was recruited straight from prison, thought by the police to be the best safe-breaker in England at the time.
30 Cdo’s operational tactic was to move ahead of advancing Allied forces, or to undertake covert missions into enemy territory by land, sea or air, to capture intelligence, in the form of equipment, documents, codes or enemy personnel. 30 Cdo often worked closely with the Intelligence Corps' Field Security sections. More often than not each team consisted of two special operations Jeeps (As used by the SAS and 30AU) manned by one Naval Commander in possession of a ‘Black Book’ which listed targets from Ian Fleming’s famous ‘Black List’. The Naval Commander was the only man in each team who knew where and what the targets actually were. This Naval Commander was usually accompanied by at least one weapons expert or scientist who he relied on to evaluate the information or equipment they encountered. There were also usually at least six Royal Marines and one RM Officer whose main job was to do any fighting required and to keep the Naval Commander and any experts alive and out of trouble. (For details Reading section.)
The individual Sections served in all the Mediterranean and NW European operational theatres, usually operating independently, gathering information from captured facilities. The unit served in North Africa, the Greek Islands, Norway, Pantelleria, Sicily, Italy, and Corsica, 1942-1943 as 30 Commando.
s the Allies broke through 30AU split into many ‘Field Teams’ and these were responsible for capturing many and varied targets throughout Germany.
Team 2 under Curtis captured Prof. Helmut Walter, designer of the Me163 Rocket Plane and Midget Submarines at Kiel. (Kept by the British!).
Team 5 under USN Lambie captured Prof. Herbert Wagner (10) (Handed to US Agents) designer of the guided flying bomb Hs293, already used to sink HMS Egret and to kill over 1000 troops on HMT Rohna. He went on to work for the US Navy. He did not surrender in Bavaria with Dornberger and the von Braun brothers as the Allied military would have us believe. (2) (see Reading section).
The capture of Prof. Magnus von Braun (Martin) V2 fuel chemist. (Handed to US Agents). He did not surrender in Bavaria as the Allied military want us to believe. (see Reading for details)
The capture of the designer of the Nazi V2 (who went on to the NASA Saturn V), Prof. von Braun and his brother. (Some men were convinced they were some of the scientists they caught!) Did they surrender in Bavaria as the Allied military want us to believe or was that staged afterwards? (see Beau Bête for details and FREE preview PDF, in Reading)
Team 55 under Glanville captured the entire Nazi Naval records collection at ‘Tambach Castle’. (1)
Team 4 under Job(e) captured the Bremen dockyards with type 21 & 25 submarines and destroyers. Then took the surrender of Bremerhaven and captured Naval HQ SS Europa and Z29 Destroyer. (1)(All handed over to US Agents).
Team 2 Postlethwaite captures the Torpedo testing facility at Ekenförde. (1)
Another team captured Admiral Dönitz (as Führer).
And many other things yet to be revealed by the government!
Every single item from The Lanes Armoury, Britain's most famous, favourite, and oldest original Armoury Antique store, is accompanied by our unique Certificate of Authenticity. Part of our continued dedication to maintain the standards forged by us over the past 100 years of our family’s trading, and thus, it is a lifetime guarantee.
Ref; https://www.30au.co.uk
An amazing historic collection of information, including. https://www.amazon.co.uk/Beau-B%C3%A9te-assigned-Flemings-intelligence/dp/B08R7XYHXW read more read more
850.00 GBP
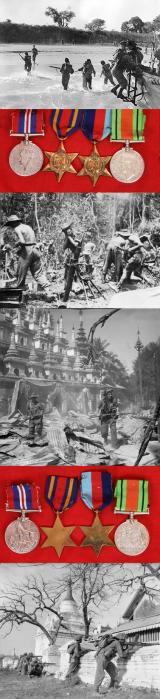
Four Royal Marine Commando WW2 Burma Campaign Medal Group, of Ronald Edward Meadowcroft 1939-46. Including Burma Railway Assisting POW Liberation Action
Acquired direct from his family.
The Royal Marines participated in the Burma Campaign during World War II, primarily in commando and amphibious assault roles. Specifically, No. 44 (Royal Marine) Commando was heavily involved, landing on the Teknaf peninsula and participating in operations like Operation Screwdriver and Operation Passport. They also supported other units in amphibious landings and worked alongside the Chindits.
Royal Marines in the Burma Campaign:
No. 44 (Royal Marine) Commando:
This unit was a key component of the 3rd Special Service Brigade and saw action against the Japanese in the Arakan region.
Amphibious Operations:
Royal Marines Commandos were frequently used in amphibious landings to support larger formations like the 25th and 26th Indian Divisions.
Chindits:
Royal Marines were involved with the Chindits, who were special operations units known for their long-range penetration tactics in the Burmese jungle.
Supporting Role:
Royal Marines also served in a supporting role, providing engineer support and contributing to the defense of vital installations.
The campaign in Burma was brutal, with significant casualties from both combat and disease.
Operation Screwdriver:
No. 44 Commando participated in this operation, landing at Alethangyaw and securing the town for the advance of other units.
Operation Passport:
Following their time on Akyab, No. 44 Commando was ordered to Myebon as part of Operation Passport.
Other Operations:
They were also involved in operations in the Arakan region, supporting the advance of other units read more
135.00 GBP

Early Luftwaffe Transport & Glider Silver Squadron Combat Clasp in Silver (Frontflugspange für Transport und Luftlandflieger in Silber)From One Of Ian Fleming’s Naval Intelligence Section’s So Called ‘Red Indians’ 30 Commando Special Engineering Unit
The first Flight Clasps were introduced on January 30, 1941 by the Commander-in-Chief of the Luftwaffe, Hermann Goring The Bronze grade clasp was awarded for participation in 20 combat missions, the Silver grade clasp for 60 missions, and the Gold grade clasp for 110 missions.
Constructed of silvered tombak with nice patina. The reverse is unmarked which includes a barrel hinge complete with a flattened tapered pin and round wire catch, The clasp has no damage or repairs and in good condition.
The silver grade clasp, being the second out of 3 grades, was awarded to transport aircraft and glider pilots for carrying out 60 missions.
A highly desirable original collectors item, uncleaned unpolished, kept just as is, untouched and unmolested for the past 80 years
Originally taken by a commando of 30 commando X troop while on clandestine missions as part of 30 Commando reconnaissance and sabotage.
The brain child of naval commander Ian Fleming & Lord Louis Mountbatten, 30 {30AU} Commando, this wartime unit was a secret well kept for over 50 years after the war by the Official Secrets Act, some remains classified, see Reading. At the time, officially, they didn’t exist. The members of this unit were forbidden to discuss or document their activities, a pledge that many of the men kept even many years after the war was over, or even for their entire lives!
Due to the fact these men operated in very small groups on ‘need-to-know’ basis it is very difficult to get clear picture of everything they were doing.
Fleming’s/NID30AU secretary Miss Margaret Priestley (a history professor from Leeds University) played a vital role in the running and administration of 30AU and became his inspiration for Miss Petty Pettaval - the original character name that became Miss Moneypenny.
As revealed here for the first time!(6) (see Beau Bête)
Miss Preistley transferred over to NID30AU during the winter of 1943-44 from DNR - (Department of Naval Research) where she worked as a civilian, although there were obvious links between DNR and NID30AU as intelligence on enemy targets was collected for Fleming’s ‘Black List’.
Also Known as:
Fleming himself referred to the men of the unit as behaving like 'Red Indians'. (A reference he also used when referring to his character, James Bond, four times in his first novel Casino Royale. Which effectively makes this unit the ‘literary James Bond’s wartime unit’.)
Formerly:- (NID30 Command Office at Admiralty),
Special Engineering Unit.
'RED' Marines.
Latterly:- 30 Assault Unit,
30 Advanced Unit, 30AU
and incorrectly as 30th Assault Unit.
The number '30' was used for no better reason than it was NID/Miss Priestley’s Office Door number at the Admiralty. (Fleming’s Office was No. 39) 'Assault Unit' was 'overt' cover for the fact that they were intelligence gathering.
Date Founded: 30 September 1942
Date Disbanded: 26 March 1946
Date Reformed: February 2010 - 30 Cdo IXG
Mission When Founded:
The collection of technical intelligence and personnel from enemy headquarters and installations. Ahead of allied advances and before enemy could destroy it, to ‘Attain by Surprise’.
30 Commando consisted of Royal Marine, Army and Royal Navy elements that were organised into three Sections: No. 33, No. 34 and No.36 respectively. Initially code-named the Special Engineering Unit, the unit reported to the Chief of Combined Operations, though the Admiralty retained ultimate control of No.36 Section. No.35 Section was left vacant for the RAF to utilise but they never raised a troop to participate in 30 Cdo. Although they did supply intelligence officers and specific targets to pursue after D-Day for ‘Operation Crossbow’.
Unit members were given general commando skills and weapons training, and were then trained in recognising enemy mines, booby traps, handling of explosives, demolitions, counter-demolitions, recognition of enemy uniforms and equipment. Parachute training, small boat handling, recognition of enemy documents, search techniques including lock picking and safecracking, prisoner handling, photography and escape techniques were also taught.
A significant number of the initial recruits were formerly policemen. Although at least one ‘expert’ was recruited straight from prison, thought by the police to be the best safe-breaker in England at the time.
30 Cdo’s operational tactic was to move ahead of advancing Allied forces, or to undertake covert missions into enemy territory by land, sea or air, to capture intelligence, in the form of equipment, documents, codes or enemy personnel. 30 Cdo often worked closely with the Intelligence Corps' Field Security sections. More often than not each team consisted of two special operations Jeeps (As used by the SAS and 30AU) manned by one Naval Commander in possession of a ‘Black Book’ which listed targets from Ian Fleming’s famous ‘Black List’. The Naval Commander was the only man in each team who knew where and what the targets actually were. This Naval Commander was usually accompanied by at least one weapons expert or scientist who he relied on to evaluate the information or equipment they encountered. There were also usually at least six Royal Marines and one RM Officer whose main job was to do any fighting required and to keep the Naval Commander and any experts alive and out of trouble. (For details Reading section.)
The individual Sections served in all the Mediterranean and NW European operational theatres, usually operating independently, gathering information from captured facilities. The unit served in North Africa, the Greek Islands, Norway, Pantelleria, Sicily, Italy, and Corsica, 1942-1943 as 30 Commando.
s the Allies broke through 30AU split into many ‘Field Teams’ and these were responsible for capturing many and varied targets throughout Germany.
Team 2 under Curtis captured Prof. Helmut Walter, designer of the Me163 Rocket Plane and Midget Submarines at Kiel. (Kept by the British!).
Team 5 under USN Lambie captured Prof. Herbert Wagner (10) (Handed to US Agents) designer of the guided flying bomb Hs293, already used to sink HMS Egret and to kill over 1000 troops on HMT Rohna. He went on to work for the US Navy. He did not surrender in Bavaria with Dornberger and the von Braun brothers as the Allied military would have us believe. (2) (see Reading section).
The capture of Prof. Magnus von Braun (Martin) V2 fuel chemist. (Handed to US Agents). He did not surrender in Bavaria as the Allied military want us to believe. (see Reading for details)
The capture of the designer of the Nazi V2 (who went on to the NASA Saturn V), Prof. von Braun and his brother. (Some men were convinced they were some of the scientists they caught!) Did they surrender in Bavaria as the Allied military want us to believe or was that staged afterwards? (see Beau Bête for details and FREE preview PDF, in Reading)
Team 55 under Glanville captured the entire Nazi Naval records collection at ‘Tambach Castle’. (1)
Team 4 under Job(e) captured the Bremen dockyards with type 21 & 25 submarines and destroyers. Then took the surrender of Bremerhaven and captured Naval HQ SS Europa and Z29 Destroyer. (1)(All handed over to US Agents).
Team 2 Postlethwaite captures the Torpedo testing facility at Ekenförde. (1)
Another team captured Admiral Dönitz (as Führer).
And many other things yet to be revealed by the government!
Ref; https://www.30au.co.uk
An amazing historic collection of information, including. https://www.amazon.co.uk/Beau-B%C3%A9te-assigned-Flemings-intelligence/dp/B08R7XYHXW read more read more
550.00 GBP